
2. Installation, Startup, and Interface Tour
Streszczenie: Instalacja i uruchomienie CME 2: pobranie i instalacja programu, konfiguracja portów szeregowych i sieci CAN w kreatorze Communications Wizard, łączenie ze wzmacniaczem w drzewie Copley Neighborhood, zmiana nazwy wzmacniacza oraz przegląd interfejsu (pasek narzędzi, menu główne, schemat funkcjonalny, pasek statusu CAN/DeviceNet).
EN: Installing and starting CME 2, serial and CAN communication setup, connecting to and renaming an amplifier, and a tour of the interface.
Dotyczy: program CME 2 do konfiguracji i strojenia serwonapędów oraz napędów krokowych Copley Controls (m.in. Xenus, Accelnet, Stepnet, Accelus, Junus)
Źródło: dokumentacja producenta (Copley Controls CME 2 User Guide); tabele przepisane z obrazów na tekst, opisy diagramów – opracowanie Multiprojekt
This chapter shows how to install, start, and set up communications for CME 2. Perform the steps outlined below. Details follow in the chapter.
11. Verify that the system on which you will install CME 2 meets the Host Computer Requirements
NOTE: Vista users see Special Notes for Vista Users
2. Install CME 2 Software
3. Start CME 2
4. Configure Serial Port Parameters (p. 14) or Configure CAN Network Parameters (To set up for DeviceNet control, see the Copley Controls Copley DeviceNet Programmer’s Guide.)
The chapter also includes CME 2 Interface Tour and describes how to Connect to an Amplifier in CME 2 (p. 17) and Rename an Amplifier
2.1:1 Install CME 2 Software
Optionally download software from the Web
1.1 Choose or create a folder where you will download the software installation file.2
2. In an internet browser, navigate to: http://www.copleycontrols.com/Motion/Downloads/index.html3
3. Under Software Releases, click on CME 2.4
4. When prompted, save the CME2.zip file to the folder chosen or created in Step 1. The folder should now contain a file named CME2.zip.5
5. Extract the contents of the zip file to the same location. The folder should now contain the files CME2.zip and Setup.exe.6
6. If desired, delete CME2.zip to save disk space.
Install CME 2 Software
1.1 If installing from a CD, insert the CD (Copley Controls part number CME2). Normally, inserting the CD causes the installation script to launch, and a CME 2 Installation screen appears. If so, skip to Step 3.2
2. If the software installation file is on a hard drive, navigate to the folder and then doubleclick on Setup.exe OR if you inserted the CD and the CME 2 Installation screen did not appear, navigate to the
root directory of the installation CD and then double-click on Setup.exe.3
3. Respond to the prompts on the CME 2 Installation screens to complete the installation. We recommend accepting all default installation values.
NOTE: Vista users see Special Notes for Vista Users (p. 8).
2.2:2 Start CME 2 Software
11.  Double-click the CME 2 shortcut icon on the Windows desktop to start CME 2.
2
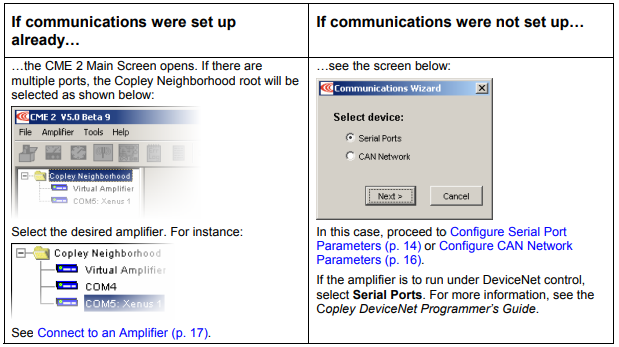
After an amplifier has been selected, the CME 2 Main Screen looks similar to this:
If the Basic Setup options have not been chosen, the Basic Setup screen opens.
2.3:3 Configure Serial Port Parameters
One or more serial ports on a PC can be used to connect amplifiers. Use the following instructions to add ports for amplifiers, to choose baud rates for those ports, and to remove ports for amplifiers.
Also use this procedure if the amplifier is to run under DeviceNet control. For more information, see the Copley Controls Copley DeviceNet Programmer’s Guide.
1.  Double-click the CME 2 shortcut icon on the Windows desktop to start CME 2.
If a serial or CAN port has not been selected, the Communications Wizard Select device screen appears.
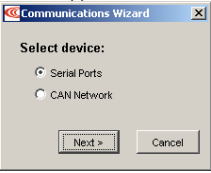
22. If the CME 2 Main screen appears instead of Select Device, choose ToolsCommunicationsTools → Communications Wizard.3
3. Choose Serial Ports and click Next to open the Communications Wizard Select Ports/Serial Ports screen.
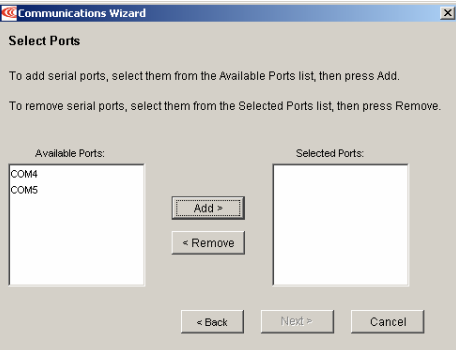
44. From the Available Ports list, choose the serial ports that will be used for amplifiers.
To allow an amplifier to connect through a port, select the port name and click Add.
To remove a port from Selected Ports, select the port name and click Remove.
...Configure Serial Port Parameters, continued:
55. Click Next to save the choices and open the Communications Wizard Configure Serial Ports screen.
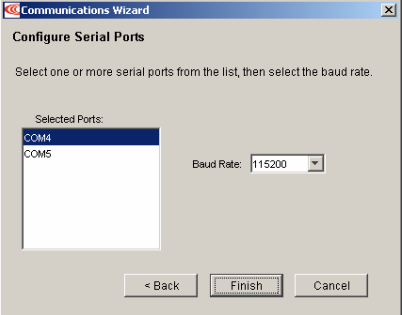
6. Configure the desired ports.
Highlight a port in the Selected Ports list.
Choose a Baud Rate for that port.
Repeat for each selected port.
7. Click Finish to save the choices.
2.4:4 Configure CAN Network Parameters
A CAN port can be used to connect the host PC to one or more amplifiers. Use the following instructions to configure CAN network settings.1
1.  Double-click the CME 2 shortcut icon on the Windows desktop to start CME 2.
If communications have not been set up, the Communications Wizard Select device screen appears.
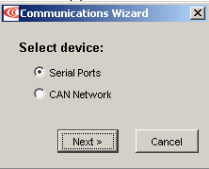
22. If the CME 2 Main screen appears choose ToolsCommunicationsTools → Communications Wizard.
33. Choose CAN Network
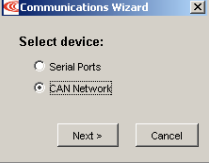
44. Click Next to open the Communications Wizard Configure CAN Network screen.
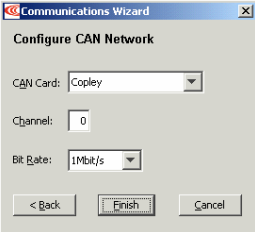
55. Choose the appropriate CAN Card, Channel, and Bit Rate, and click Finish.
NOTES:
1) The CAN Card list shows the manufacturer names of all supported CAN cards that have been connected to the PC and for which drivers have been installed.
2) All amplifiers must be set to the same bit rate (default is 1 Mbit/s).
2.5:5 Connect to an Amplifier in CME 2
Choose an amplifier by clicking on its name in the Copley Neighborhood. The neighborhood organizes amplifiers according to the connection method.
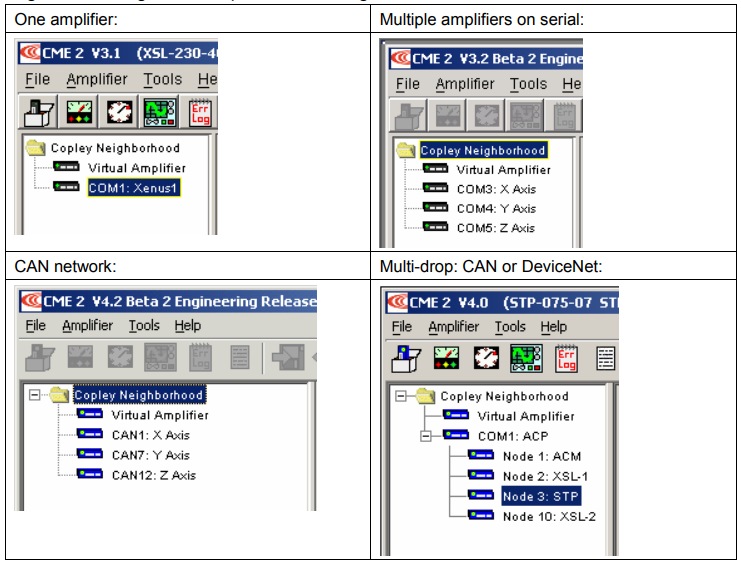
When there is only one amplifier available for connection, the software will connect automatically on startup.
2.6:6 Rename an Amplifier
Each amplifier represented in the Copley Neighborhood amplifier tree has a name. The default name for an amplifier is unnamed. Use this procedure to rename an amplifier.1
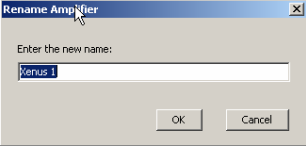
22. Enter the new name and click OK to close the screen.
2.7:7 CME 2 Interface Tour
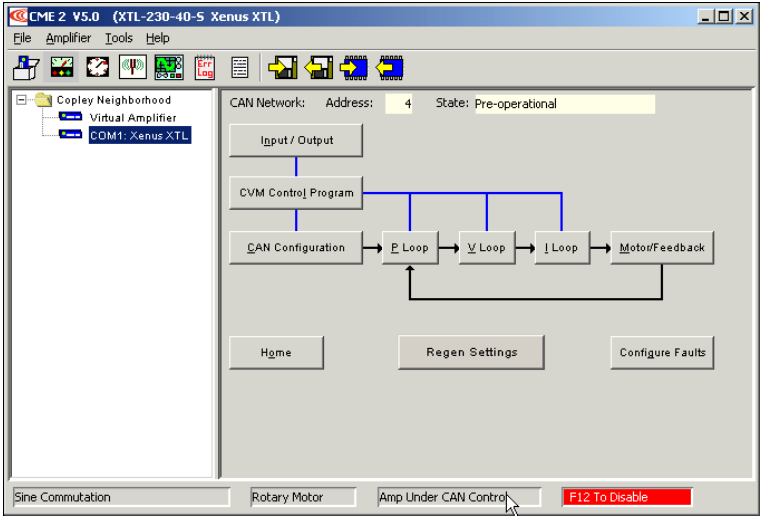
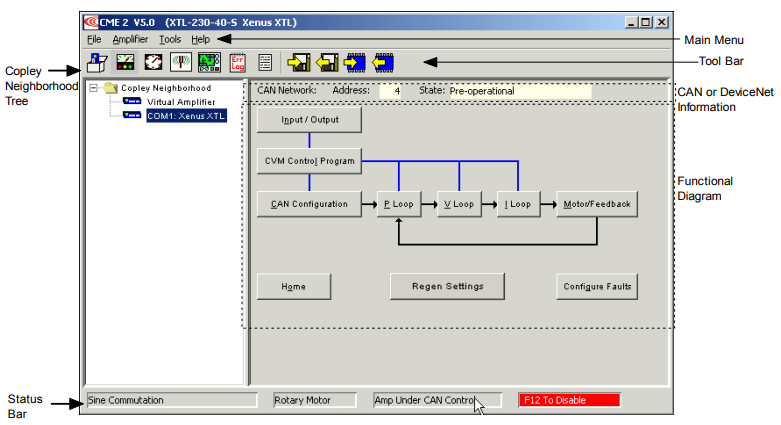
CME 2 features are called out in the diagram below. Screen details vary depending on amplifier model and mode selection. Details follow in the chapter.
2.7.1:1 Tool Bar Overview
Click on any of the tools in the toolbar to access the tools described below
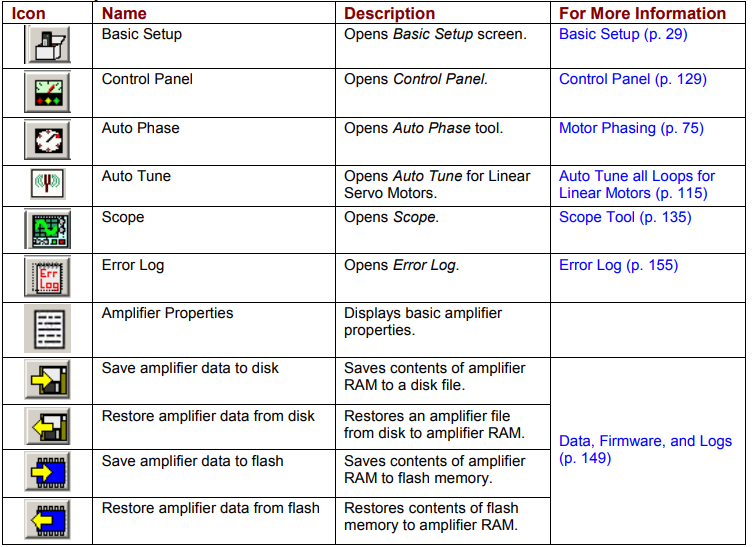
| Name | Description | For |
|---|---|---|
| Basic Setup | Opens Basic Setup screen. | Basic Setup |
| Control Panel | Opens Control Panel. | Control Panel |
| Auto Phase | Opens Auto Phase tool. | Motor Phasing |
| Auto Tune | Opens Auto Tune for Linear Servo Motors. | Auto Tune all Loops for Linear Motors |
| Scope | Opens Scope. | Scope Tool |
| Error Log | Opens Error Log. | Error Log |
| Amplifier Properties | Displays basic amplifier properties. | |
| Save amplifier data to disk | Saves contents of amplifier RAM to a disk file. | Data, Firmware, and Logs |
| Restore amplifier data from disk | Restores an amplifier file from disk to amplifier RAM. | Data, Firmware, and Logs |
| Save amplifier data to flash | Saves contents of amplifier RAM to flash memory. | Data, Firmware, and Logs |
| Restore amplifier data from flash | Restores contents of flash memory to amplifier RAM. | Data, Firmware, and Logs |
2.7.2:2 Main Menu Overview
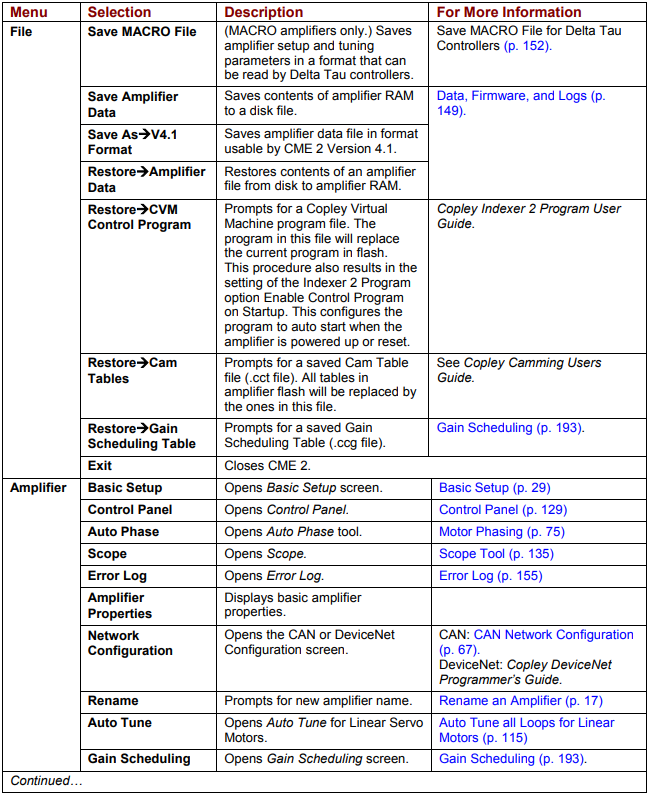
CME 2 main screen menus (part 1)
| Menu | Selection | Description | For More Information |
|---|---|---|---|
| File | Save MACRO File | (MACRO amplifiers only.) Saves amplifier setup and tuning parameters in a format that can be read by Delta Tau controllers. | Save MACRO File for Delta Tau Controllers |
| File | Save Amplifier Data | Saves contents of amplifier RAM to a disk file. | Data, Firmware, and Logs |
| File | Save As → V4.1 Format | Saves amplifier data file in format usable by CME 2 Version 4.1. | Data, Firmware, and Logs |
| File | Restore → Amplifier Data | Restores contents of an amplifier file from disk to amplifier RAM. | Data, Firmware, and Logs |
| File | Restore → CVM Control Program | Prompts for a Copley Virtual Machine program file. The program in this file will replace the current program in flash. This procedure also results in the setting of the Indexer 2 Program option Enable Control Program on Startup. This configures the program to auto start when the amplifier is powered up or reset. | Copley Indexer 2 Program User Guide |
| File | Restore → Cam Tables | Prompts for a saved Cam Table file (.cct file). All tables in amplifier flash will be replaced by the ones in this file. | Copley Camming Users Guide |
| File | Restore → Gain Scheduling Table | Prompts for a saved Gain Scheduling Table (.ccg file). | Gain Scheduling |
| File | Exit | Closes CME 2. | |
| Amplifier | Basic Setup | Opens Basic Setup screen. | Basic Setup |
| Amplifier | Control Panel | Opens Control Panel. | Control Panel |
| Amplifier | Auto Phase | Opens Auto Phase tool. | Motor Phasing |
| Amplifier | Scope | Opens Scope. | Scope Tool |
| Amplifier | Error Log | Opens Error Log. | Error Log |
| Amplifier | Amplifier Properties | Displays basic amplifier properties. | |
| Amplifier | Network Configuration | Opens the CAN or DeviceNet Configuration screen. | CAN: CAN Network Configuration. DeviceNet: Copley DeviceNet Programmer’s Guide |
| Amplifier | Rename | Prompts for new amplifier name. | Rename an Amplifier |
| Amplifier | Auto Tune | Opens Auto Tune for Linear Servo Motors. | Auto Tune all Loops for Linear Motors |
| Amplifier | Gain Scheduling | Opens Gain Scheduling screen. | Gain Scheduling |
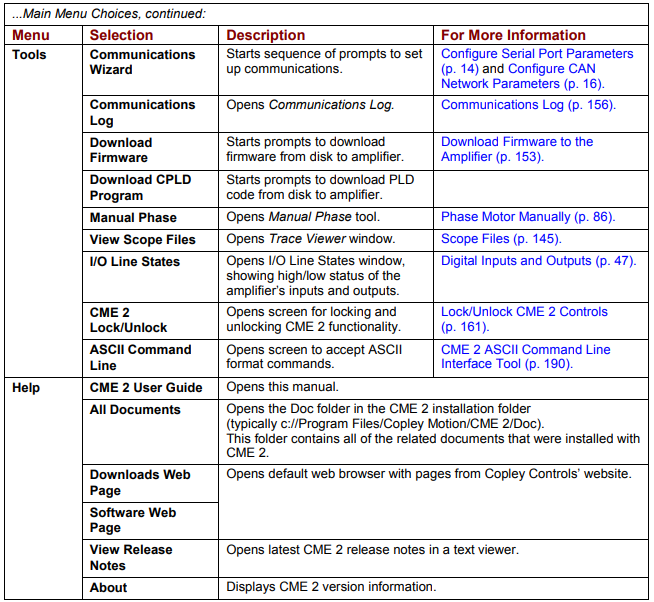
CME 2 main screen menus (part 2)
| Menu | Selection | Description | For More Information |
|---|---|---|---|
| Tools | Communications Wizard | Starts sequence of prompts to set up communications. | Configure Serial Port Parameters and Configure CAN Network Parameters |
| Tools | Communications Log | Opens Communications Log. | Communications Log |
| Tools | Download Firmware | Starts prompts to download firmware from disk to amplifier. | Download Firmware to the Amplifier |
| Tools | Download CPLD Program | Starts prompts to download PLD code from disk to amplifier. | |
| Tools | Manual Phase | Opens Manual Phase tool. | Phase Motor Manually |
| Tools | View Scope Files | Opens Trace Viewer window. | Scope Files |
| Tools | I/O Line States | Opens I/O Line States window, showing high/low status of the amplifier’s inputs and outputs. | Digital Inputs and Outputs |
| Tools | CME 2 Lock/Unlock | Opens screen for locking and unlocking CME 2 functionality. | Lock/Unlock CME 2 Controls |
| Tools | ASCII Command Line | Opens screen to accept ASCII format commands. | CME 2 ASCII Command Line Interface Tool |
| Help | CME 2 User Guide | Opens this manual. | |
| Help | All Documents | Opens the Doc folder in the CME 2 installation folder (typically c://Program Files/Copley Motion/CME 2/Doc). This folder contains all of the related documents that were installed with CME 2. | |
| Help | Downloads Web Page | Opens default web browser with pages from Copley Controls’ website. | |
| Help | Software Web Page | Opens default web browser with pages from Copley Controls’ website. | |
| Help | View Release Notes | Opens latest CME 2 release notes in a text viewer. | |
| Help | About | Displays CME 2 version information. |
2.7.3:3 Functional Diagram
The functional diagram, shown below, provides button-click access to most of the screens used to configure an amplifier. It also indicates the flow of control from input, across all active control loops, to motor/feedback. Only those control loop buttons that are appropriate to the amplifier and operational mode appear on the diagram.
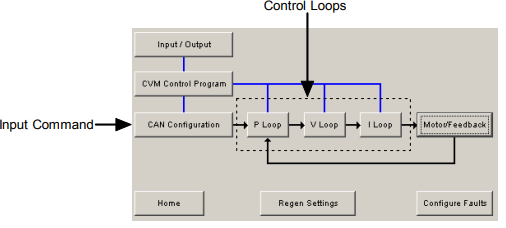
Diagram
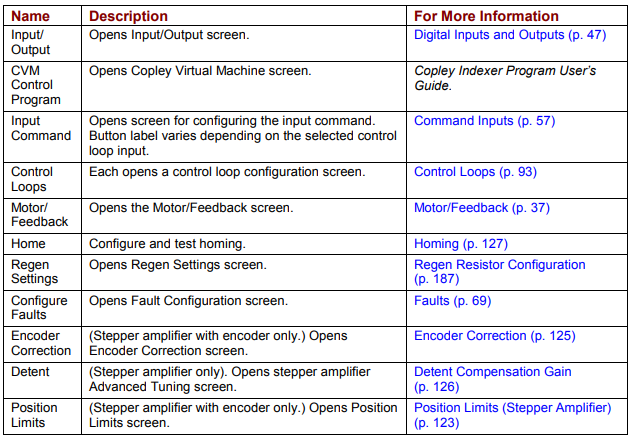
CME 2 main screen buttons
| Name | Description | For More Information |
|---|---|---|
| Input/Output | Opens Input/Output screen. | Digital Inputs and Outputs |
| CVM Control Program | Opens Copley Virtual Machine screen. | Copley Indexer Program User’s Guide |
| Input Command | Opens screen for configuring the input command. Button label varies depending on the selected control loop input. | Command Inputs |
| Control Loops | Each opens a control loop configuration screen. | Control Loops |
| Motor/Feedback | Opens the Motor/Feedback screen. | Motor/Feedback |
| Home | Configure and test homing. | Homing |
| Regen Settings | Opens Regen Settings screen. | Regen Resistor Configuration |
| Configure Faults | Opens Fault Configuration screen. | Faults |
| Encoder Correction | (Stepper amplifier with encoder only.) Opens Encoder Correction screen. | Encoder Correction |
| Detent | (Stepper amplifier only). Opens stepper amplifier Advanced Tuning screen. | Detent Compensation Gain |
| Position Limits | (Stepper amplifier with encoder only.) Opens Position Limits screen. | Position Limits (Stepper Amplifier) |
2.7.4:4 CAN or DeviceNet Information and Status Bar
CAN or DeviceNet Information
The Main screen displays the basic CAN or DeviceNet information. The example below shows CAN information:

The Address field shows the amplifier’s present CAN or DeviceNet address. For more information, see CAN Network Configuration (p. 67) or the Copley DeviceNet Programmer’s Guide. When the Position Loop Input is set to CAN, the State field shows the state of the amplifier’s CANopen state machine (for more information, see Copley Control’s CANopen Programmer’s Manual).
Status Bar
The status bar describes the present commutation mode, motor type, and amplifier control status as shown below. It also includes a reminder that pressing the F12 function key while CME 2 is running disables the amplifier.

Słowa kluczowe
instalacja CME 2, Communications Wizard, port szeregowy, prędkość transmisji, karta CAN, bit rate, Copley Neighborhood, zmiana nazwy wzmacniacza, pasek narzędzi, menu główne, pasek statusu