
3. Programming
Streszczenie: Programowanie Indexer 2 w CME 2: kroki tworzenia i uruchamiania sekwencji, podstawowa konfiguracja napędu (źródło komendy CVM), ekran programu, menu File/View/Run/Tools, pasek narzędzi, konfiguracja wyboru sekwencji, komendy Go i wejścia Priority, tworzenie i edycja sekwencji, dodawanie kroków (funkcji) oraz tryb pracy krokowej i debugowania.
EN: Programming Indexer 2 in CME 2: procedure, screen, menus, toolbar, sequence selection/Go setup, editing sequences, adding steps, single-step debug.
Dotyczy: serwonapędy Copley Controls z programem Indexer 2 (CVM), program CME 2
Źródło: dokumentacja producenta (Copley Controls Indexer 2 Program User’s Guide); tabele przepisane z obrazów na tekst – opracowanie Multiprojekt
This chapter describes how to configure the Indexer 2 Program
3.1:1 Overview of Procedures
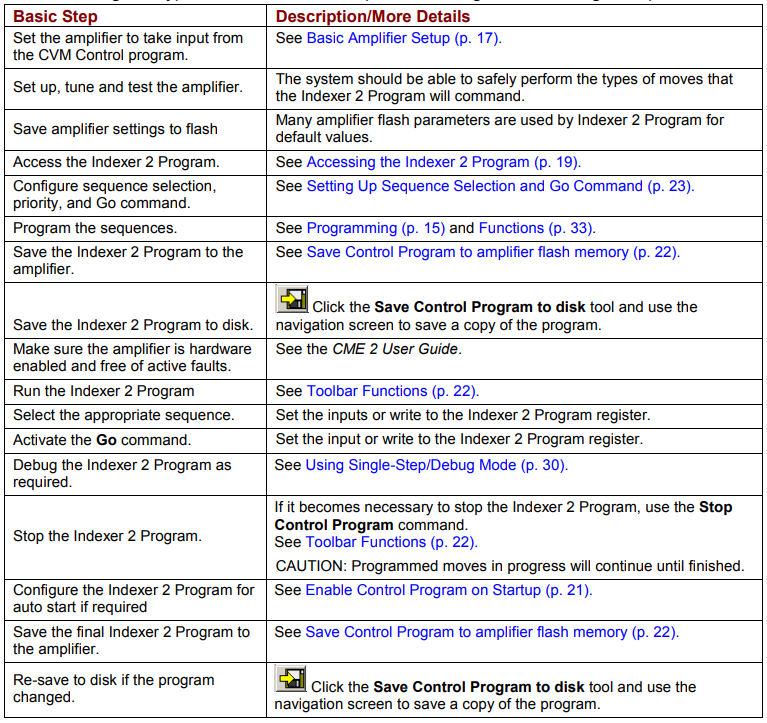
The following is a typical series of basic steps for creating and executing a sequence.
Basic steps for creating and executing a sequence
| Basic Step | Description/More Details |
|---|---|
| Set the amplifier to take input from the CVM Control program. | See Basic Amplifier Setup. |
| Set up, tune and test the amplifier. | The system should be able to safely perform the types of moves that the Indexer 2 Program will command. |
| Save amplifier settings to flash. | Many amplifier flash parameters are used by Indexer 2 Program for default values. |
| Access the Indexer 2 Program. | See Accessing the Indexer 2 Program. |
| Configure sequence selection, priority, and Go command. | See Setting Up Sequence Selection and Go Command. |
| Program the sequences. | See Programming and Functions. |
| Save the Indexer 2 Program to the amplifier. | See Save Control Program to amplifier flash memory. |
| Save the Indexer 2 Program to disk. | Click the Save Control Program to disk tool and use the navigation screen to save a copy of the program. |
| Make sure the amplifier is hardware enabled and free of active faults. | See the CME 2 User Guide. |
| Run the Indexer 2 Program. | See Toolbar Functions. |
| Select the appropriate sequence. | Set the inputs or write to the Indexer 2 Program register. |
| Activate the Go command. | Set the input or write to the Indexer 2 Program register. |
| Debug the Indexer 2 Program as required. | See Using Single-Step/Debug Mode. |
| Stop the Indexer 2 Program. | If it becomes necessary to stop the Indexer 2 Program, use the Stop Control Program command. See Toolbar Functions. CAUTION: Programmed moves in progress will continue until finished. |
| Configure the Indexer 2 Program for auto start if required. | See Enable Control Program on Startup. |
| Save the final Indexer 2 Program to the amplifier. | See Save Control Program to amplifier flash memory. |
| Re-save to disk if the program changed. | Click the Save Control Program to disk tool and use the navigation screen to save a copy of the program. |
Original image of the table (from the PDF manual)
3.2:2 Basic Amplifier Setup
3.2.1:1 Typical Basic Amplifier Setup
In a typical Indexer 2 Program application, the amplifier is programmed to operate in position mode with a software programmed command source, as described below:
Access CME 2 by clicking on the desktop icon  or using the desktop Start menu command Copley MotionCME 2CME 2. When the F12 Disables Amplifier prompt appears, click OK. If necessary, select an amplifier in the Copley Neighborhood tree.
Click Basic Setup and then click Change Settings. Verify each set of Basic Setup options, using the Next button until you reach the Operating Mode options. Set Operating Mode to Position and set Position Loop Input to Software Programmed.
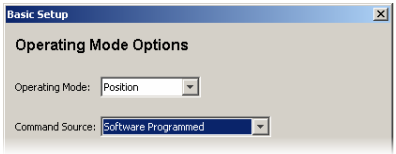
Click Next until the final Basic Setup screen (with the Finish button) opens.
Click Finish.
Verify that the amplifier has been configured, tuned and tested. See the CME 2 User Guide.
3.2.2:2 Using Indexer 2 with Other Modes and Command Sources
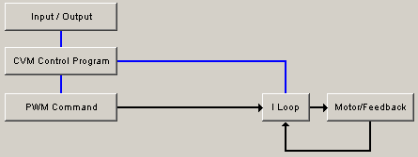
Indexer 2 Program setup controls are available in all operating mode/command source configurations. Likewise, Indexer 2 Program sequences can be launched in any operating mode/command source configuration.
For instance, the amplifier can be configured to run in current mode using a PWM command source. In this case, the Indexer 2 Program controls are accessible through the CVM Control Program button on the CME 2 Main screen as shown below.
3.3:3 Accessing the Indexer 2 Program
On the CME 2 Main screen, click CVM Control Program to open the Copley Virtual Machine: Indexer 2 Program and I/O Line States screens.
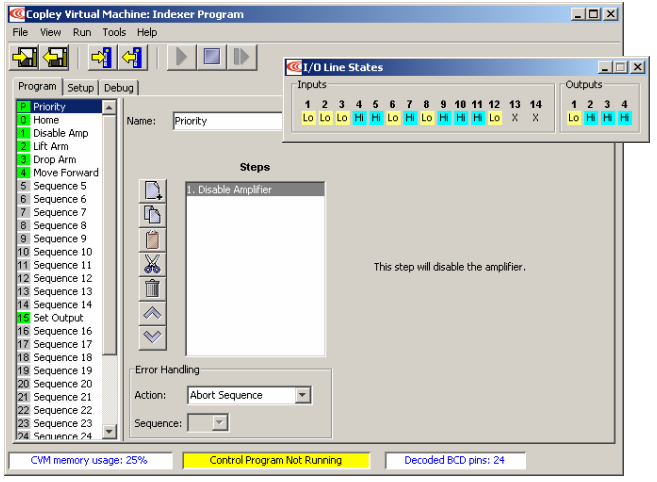
The Indexer 2 Program in the amplifier’s flash memory will be displayed. The numbers of sequences which have been programmed with steps will be displayed with a green background, as some of the sequences shown above. The I/O Line States screen shows real-time status of the amplifier’s digital inputs and outputs.
3.4:4 Indexer 2 Program Screen Overview
Major elements of the Indexer 2 Program screen are highlighted below.
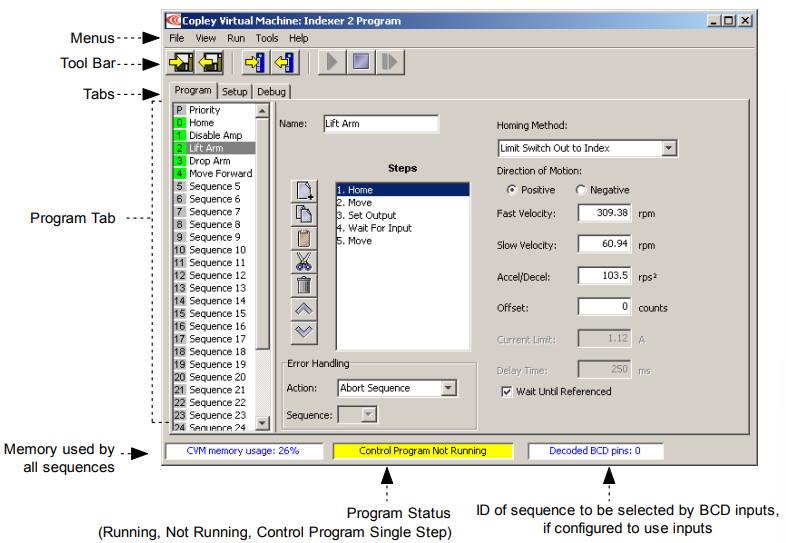
The Program tab is used to create and modify sequences.
See Creating and Modifying Sequences
and Adding Steps (Functions) to a Sequence
The Setup tab is used to set up sequence selection, Priority sequence, and Go command.
See Setting Up Sequence Selection and Go Command
The Debug tab is used to run the Indexer 2 Program in single-step/debug mode.
See Using Single-Step/Debug Mode
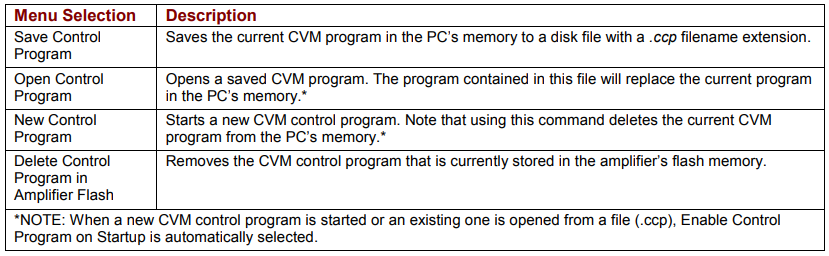
3.5:5 Menus
3.5.1:1 File Menu
| Menu Selection | Description |
|---|---|
| Save Control Program | Saves the current CVM program in the PC’s memory to a disk file with a .ccp filename extension. |
| Open Control Program | Opens a saved CVM program. The program contained in this file will replace the current program in the PC’s memory.* |
| New Control Program | Starts a new CVM control program. Note that using this command deletes the current CVM program from the PC’s memory.* |
| Delete Control Program in Amplifier Flash | Removes the CVM control program that is currently stored in the amplifier’s flash memory. |
| *NOTE: When a new CVM control program is started or an existing one is opened from a file (.ccp), Enable Control Program on Startup is automatically selected. | |
Original image of the table (from the PDF manual)
3.5.2:2 View Menu
| Menu Selection | Description |
|---|---|
| Assembly Code | Displays the assembly language code of the CVM program in the PC’s memory. |
| CVM Directory | Opens the CVM Directory screen, which displays all files stored in the CVM flash memory. |
| Register Values | Displays the current values of the Indexer 2 Program’s 32 registers (R0-R31). |
| Bean Versions | Displays the ID number and version of all the functions installed in the CME 2 CVM library (typically C:\Program Files\Copley Motion\CME 2\CvmLib). |
Original image of the table (from the PDF manual)

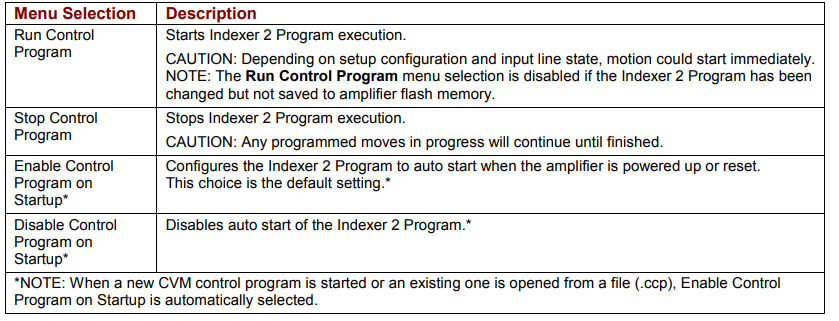
3.5.3:3 Run Menu
| Menu Selection | Description |
|---|---|
| Run Control Program | Starts Indexer 2 Program execution. CAUTION: Depending on setup configuration and input line state, motion could start immediately. NOTE: The Run Control Program menu selection is disabled if the Indexer 2 Program has been changed but not saved to amplifier flash memory. |
| Stop Control Program | Stops Indexer 2 Program execution. CAUTION: Any programmed moves in progress will continue until finished. |
| Enable Control Program on Startup* | Configures the Indexer 2 Program to auto start when the amplifier is powered up or reset. This choice is the default setting.* |
| Disable Control Program on Startup* | Disables auto start of the Indexer 2 Program.* |
| *NOTE: When a new CVM control program is started or an existing one is opened from a file (.ccp), Enable Control Program on Startup is automatically selected. | |
Original image of the table (from the PDF manual)
3.5.4:4 Tools Menu
| Menu Selection | Description |
|---|---|
| Clear All CVM/Cam Flash | Deletes all CVM control programs, Cam tables and gain scheduling tables from the amplifier CVM flash memory. Available only when Indexer 2 Program is not running. CAUTION: This command will delete all data stored in the amplifier CVM flash memory. It should only be used when it is believed that this memory has been corrupted. |
Original image of the table (from the PDF manual)

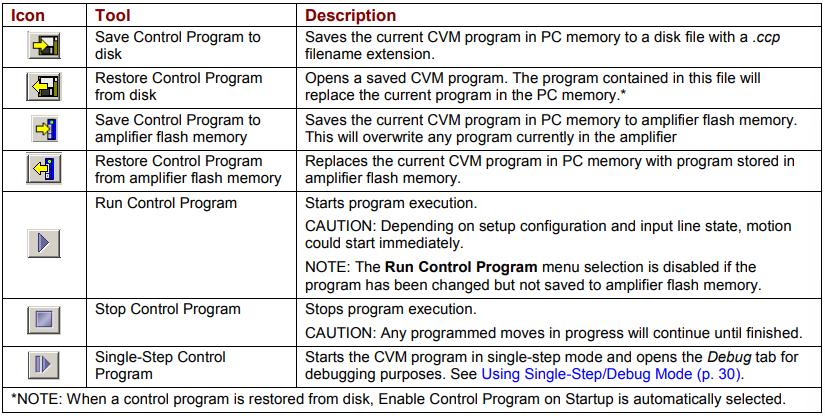
3.6:6 Toolbar Functions
Near the top of the Indexer 2 Program screen is a set of tool buttons:

Click on the appropriate tool button to perform the functions described below:
Toolbar tools
| Tool | Description |
|---|---|
| Save Control Program to disk | Saves the current CVM program in PC memory to a disk file with a .ccp filename extension. |
| Restore Control Program from disk | Opens a saved CVM program. The program contained in this file will replace the current program in the PC memory.* |
| Save Control Program to amplifier flash memory | Saves the current CVM program in PC memory to amplifier flash memory. This will overwrite any program currently in the amplifier. |
| Restore Control Program from amplifier flash memory | Replaces the current CVM program in PC memory with program stored in amplifier flash memory. |
| Run Control Program | Starts program execution. CAUTION: Depending on setup configuration and input line state, motion could start immediately. NOTE: The Run Control Program menu selection is disabled if the program has been changed but not saved to amplifier flash memory. |
| Stop Control Program | Stops program execution. CAUTION: Any programmed moves in progress will continue until finished. |
| Single-Step Control Program | Starts the CVM program in single-step mode and opens the Debug tab for debugging purposes. See Using Single-Step/Debug Mode. |
| *NOTE: When a control program is restored from disk, Enable Control Program on Startup is automatically selected. | |
Original image of the table (from the PDF manual)
3.7:7 Setting Up Sequence Selection and Go Command
Click Setup to access Sequence Selection, Go Command, and Priority Input Command controls.
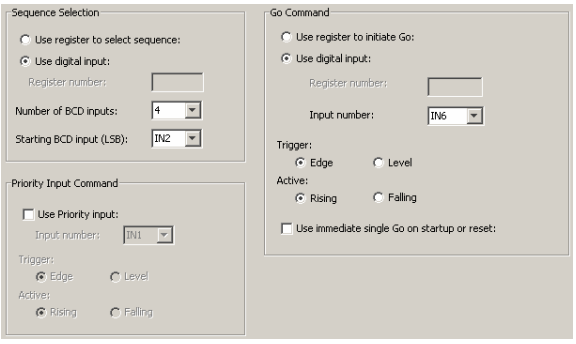
3.7.1:1 Sequence Selection
Use Register to Select Sequence
To configure register selection, click Use register to select sequence and then enter the Register number (range R0-R31) of the register which will contain the sequence number.
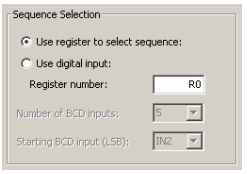
For information on writing the sequence number, see Use a Register to Select a Sequence.
Use Digital Input to Select Sequence
To configure Indexer 2 Program to use digital inputs for sequence selection, click Use digital input in the Sequence Selection box:
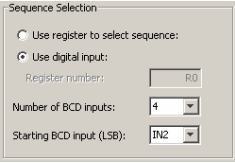
Select appropriate values for the following fields.
| Field | Description |
|---|---|
| Number of BCD inputs | Selects the number of inputs to be used for selecting sequences. The number of inputs chosen determines the number of sequences that can be selected using the inputs. For instance, 1 input can be used to select sequence 0 or sequence 1. Five inputs can be used to select any of the 32 sequences. See Use Digital Inputs to Select a Sequence. |
| Starting BCD input (LSB) | Selects which input will be used for the least significant bit of the sequence address. The remaining address lines will be on consecutively higher inputs. |
Original image of the table (from the PDF manual)

NOTE: The BCD inputs are only read when the Go command is received. The inputs can then be used for other purposes until the next Go command is expected. Exercise caution to avoid conflicting uses of an input.
3.7.2:2 Go Command
Choose one of the Go commands described below. Clicking Use immediate single Go on startup or reset triggers a Go command on start up or reset or when the Run button is pushed.
After that, the register or digital input Go commands function as programmed.
Use Register to Initiate Go
Click Use register to initiate go.
Enter the Register number (range R0-R31) of the Go command register. (If Use register to select sequence was also checked, the sequence selection register number will be changed to match Go command register number.)
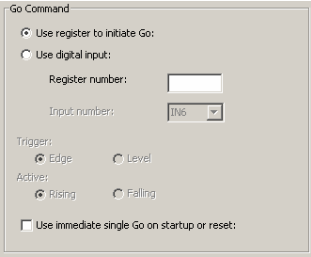
For information on setting the Go bit (Bit 15), see Use a Register to Initiate Go (p. 12).
Use Digital Input to Initiate Go
Click Use digital input.
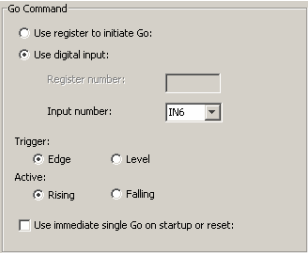
Select appropriate values for the following fields.
Go command (digital input) fields
| Field | Description |
|---|---|
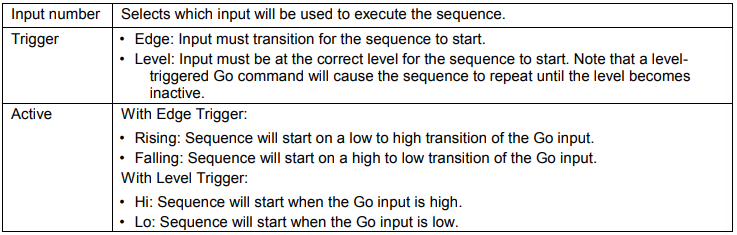
| Input number | Selects which input will be used to execute the sequence. |
| Trigger | Edge: Input must transition for the sequence to start. Level: Input must be at the correct level for the sequence to start. Note that a level-triggered Go command will cause the sequence to repeat until the level becomes inactive. |
| Active | With Edge Trigger: Rising – sequence will start on a low to high transition of the Go input; Falling – sequence will start on a high to low transition of the Go input. With Level Trigger: Hi – sequence will start when the Go input is high; Lo – sequence will start when the Go input is low. |
Original image of the table (from the PDF manual)
3.7.3:3 Priority Input Command
Click Use Priority input.
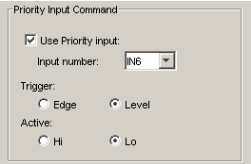
Select appropriate values for the following fields.
Priority input command fields
| Field | Description |
|---|---|
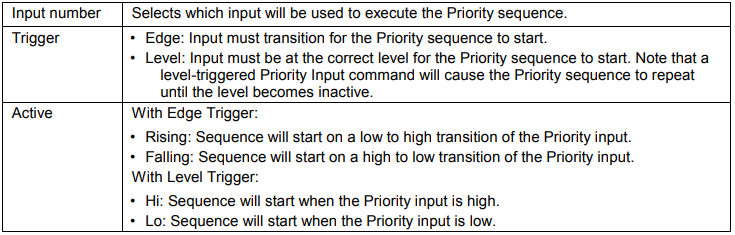
| Input number | Selects which input will be used to execute the Priority sequence. |
| Trigger | Edge: Input must transition for the Priority sequence to start. Level: Input must be at the correct level for the Priority sequence to start. Note that a level-triggered Priority Input command will cause the Priority sequence to repeat until the level becomes inactive. |
| Active | With Edge Trigger: Rising – sequence will start on a low to high transition of the Priority input; Falling – sequence will start on a high to low transition of the Priority input. With Level Trigger: Hi – sequence will start when the Priority input is high; Lo – sequence will start when the Priority input is low. |
Original image of the table (from the PDF manual)
3.8:8 Creating and Modifying Sequences
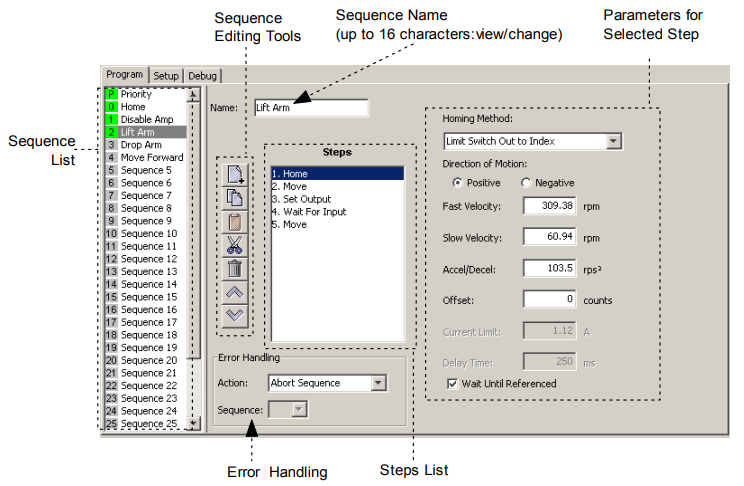
The Program tab contains tools for creating sequences.
3.8.1:1 Tools and Controls
Program tab – tools and fields
| Tool/Field | Description |
|---|---|
| Name | Displays the name of the selected sequence. Name can contain up to 16 characters. Enter name changes directly in this field. |
| Add Step | Opens the Indexer Functions screen. When a Function is selected from this screen and added, the function appears as a step in the sequence. |
| Copy Step | Place a copy of the selected step on the Indexer 2 Program’s clipboard. |
| Paste Step | Paste the contents of the Indexer 2 Program’s clipboard in the selected sequence. The step is added after the selected step. |
| Cut Step | Remove the selected step from the sequence and place it on the Indexer 2 Program’s clipboard. |
| Delete Step | Remove the selected step from the sequence. After the step is deleted it cannot be retrieved. |
| Step Up | Moves the selected step to the previous position in the sequence. |
| Step Down | Moves the selected step to the next position in the sequence. |
| Parameters | The right side of the Program tab displays the function parameters associated with the selected step, as described in Functions. |
| Error Handling: Action / Error Handling: Sequence | Abort Sequence: When a sequence error occurs, the Indexer 2 Program will immediately abort the sequence and wait for a Go command. If a Go command is received, the program will run the currently selected sequence. Jump to Sequence: On error, the Indexer 2 Program will immediately execute the sequence selected in the Sequence field (no Go command required). NOTE: Sequence errors do not necessarily result in amplifier faults and amplifier faults do not necessarily result in sequence errors. |
Original image of the table (from the PDF manual)
3.8.2:2 Sequence List
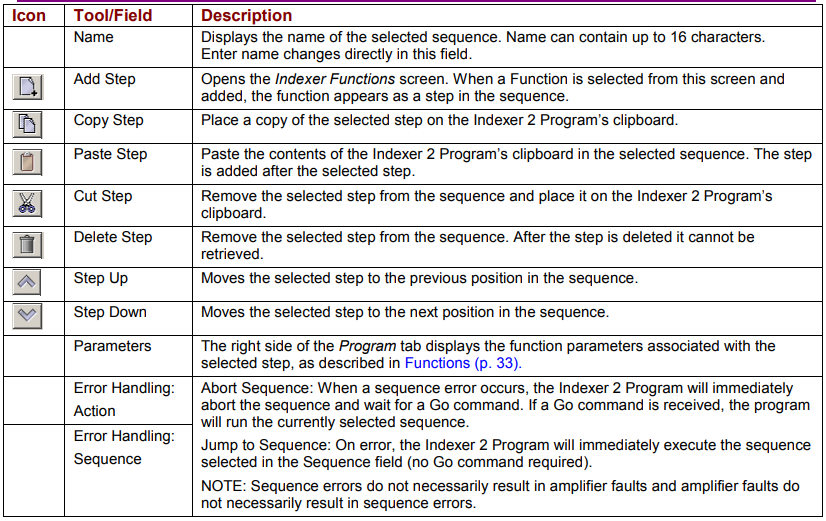
The sequence list has entries for the priority sequence and 32 sequences.
A green sequence number indicates that steps have been added to the sequence.
A grey sequence number indicates that no steps have been added to the sequence.
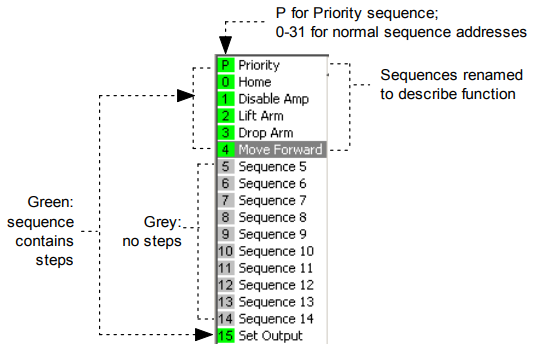
To change a sequence name, select the sequence and then enter the new name in the
Name field on the Program tab.
To program a sequence, select the sequence and proceed to
Adding Steps (Functions) to a Sequence
3.9:9 Adding Steps (Functions) to a Sequence
Select the sequence.
Click Add New Step  on the Program tab to open the Indexer Functions screen.
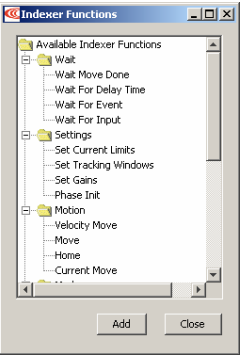
For function descriptions see Functions.
To add a function as a step at the end of the sequence, click the function name and then click Add.
To add a multiple functions, hold the Control key while clicking on the functions you wish to add, in the order in which you wish them to appear. Then click Add to add the steps to the sequence.
Program the functions as instructed in the function descriptions.
Click Close to close the screen.
See Overview of Procedures (p. 16) for a list of steps to perform to run the Indexer 2 Program.
3.10:10 Using Single-Step/Debug Mode
3.10.1:1 Overview
The Debug tab is used to display status information while the Indexer 2 Program is running in single-step/debug mode.
3.10.2:2 Entering Single-Step/Debug Mode
To single-step a sequence from the beginning:
1 Click Run Program  , then Stop Program
 and then Single Step Control Program
 .
OR
Click Save to Flash  and then Single Step Control Program
 .
The CVM program begins executing at the Indexer 2 Program Main loop level. The Debug Details frame contains the list of instructions associated with the current sequence step or Indexer 2 Main program state.
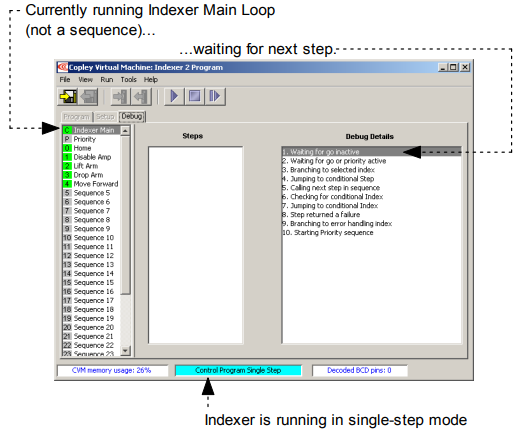
2 Click Single Step Control Program  as needed to proceed to the next step.
If the Indexer 2 Program is at a Wait step, the condition for the wait must be satisfied before the program will proceed.
To start single-stepping while an Indexer 2 Program is running:
1 Click Stop Program and then Single Step Control Program .
2 Click Single Step Control Program as needed to proceed to the next step.
If the program is at a Wait step, the condition for the wait must be satisfied before
the program will proceed.
In the example below, a Home step in Sequence 0 (named home) is ready to begin
with the next click of the Single Step Control Program button ( ).
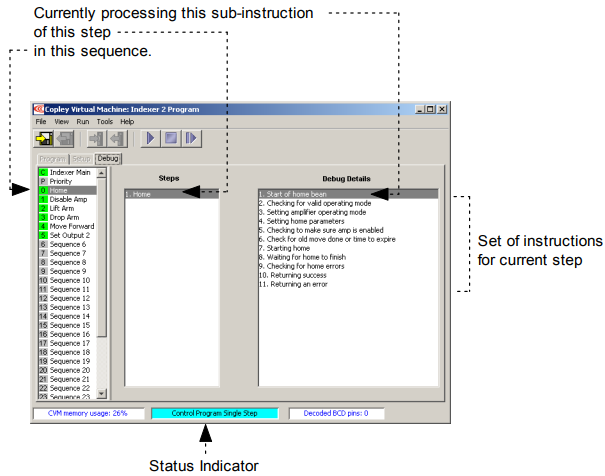
The set of instructions shown in Debug Details is an ordered list with conditional branches. For instance, if instruction 2, Checking for valid operating mode, determines that the current operating mode is valid for the move to be executed, then the program skips instruction 3, Setting amplifier operating mode and continues with instruction 4. Likewise, if step 8 finds move errors, then the program processes instruction 10, Returning an error, instead of 9, Returning success.
3.10.3:3 Exiting Single-Step/Debug Mode
Click Stop Control Program to exit single-step mode and stop the Indexer 2 Program.
Click Run Control Program to exit single-step mode and re-start the Indexer 2 Program.
Słowa kluczowe
CME 2, Indexer 2 Program, CVM Control Program, Software Programmed, sekwencja, krok, Add Step, Run Control Program, Stop, Single-Step, debug, zapis do flash, .ccp