
4. Functions (4.1–4.12) – registers, multi-axis, wait functions, settings
Streszczenie: Funkcje Indexer 2, część 1: przekazywanie wartości przez rejestry, obsługa napędów wieloosiowych, funkcje oczekiwania (Wait Move Done, Wait for Delay Time, Wait for Event, Wait for Input Mask, Wait for Position, Wait for Input, Wait for Parameter) oraz ustawienia (Set Current Limits, Set Tracking Windows, Set Gains) – parametry, jednostki rejestrów i obsługa błędów.
EN: Indexer 2 functions part 1: registers, multi-axis support, wait functions and settings functions.
Dotyczy: serwonapędy Copley Controls z programem Indexer 2 (CVM), program CME 2
Źródło: dokumentacja producenta (Copley Controls Indexer 2 Program User’s Guide); tabele przepisane z obrazów na tekst – opracowanie Multiprojekt
This chapter describes the functions that can be used in an Indexer 2 Program sequence.
4.1 Using Registers to Pass Values to Functions
In many Indexer 2 Program function parameter fields, references to the program’s 32 registers can be used in place of hard-coded numbers. For instance, move parameters can be entered as numbers (at left, below) or as register references (at right, below).
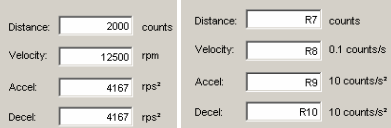
Note that in some cases, the units required for entry via the Indexer 2 Program screen are different from the units required by a register. Be sure to express all values in the units called for in the field label.
When the move is processed, the Indexer 2 Program performs the register value substitutions. Invalid data in a register will result in a sequence error.
To see the current register contents, use the ToolsView Register Values command.
4.2 Multi-Axis Amplifier Support
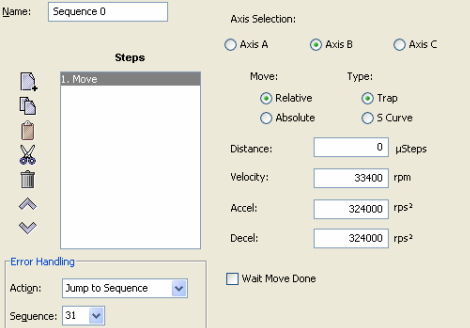
Some Copley Controls amplifier models can drive up to three separate axes, identified as Axis A, Axis B, and Axis C. On multi-axis amplifiers, the following Indexer 2 Program functions can be programmed per axis:
- Wait Move Done, Wait for Event, Wait for Position, Wait for Parameter.
- Set Current Limits, Set Tracking Windows, Set Gains.
- Velocity Move Position Mode, Move, Home.
- Disable Amplifier, Position Triggered Output, Get Set Parameter.
For instance, the Move function shown here is programmed for Axis B.
4.3 Wait Move Done
4.3.1 Wait Move Done Function Overview
Wait Move Done pauses execution of the sequence until the move in progress is completed.
4.3.2 Adding a Wait Move Done Step to a Sequence
Click Add New Step  on the Program tab to open Indexer Functions.
Click Wait: Wait Move Done to select the function. Click Add to add it to the sequence.
The Program tab displays the Wait Move Done parameters.
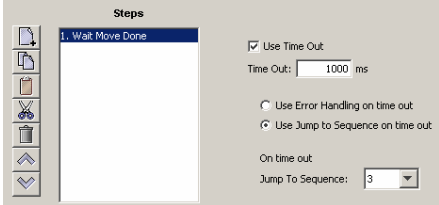
Choose appropriate values for the following parameters. Enter the Time out valuedirectly or enter the number (R0-R31) of an Indexer 2 Program register. See Using Registers to Pass Values to Functions
Wait Move Done – parameters
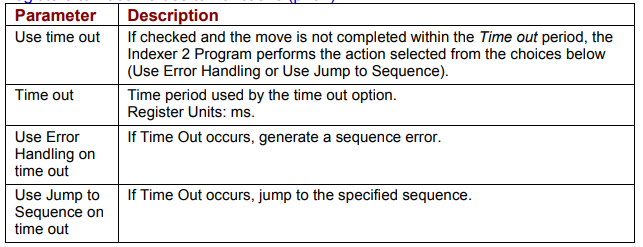
| Parameter | Description |
|---|---|
| Use time out | If checked and the move is not completed within the Time out period, the Indexer 2 Program performs the action selected from the choices below (Use Error Handling or Use Jump to Sequence). |
| Time out | Time period used by the time out option. Register Units: ms. |
| Use Error Handling on time out | If Time Out occurs, generate a sequence error. |
| Use Jump to Sequence on time out | If Time Out occurs, jump to the specified sequence. |
Original image of the table (from the PDF manual)
4.3.3 Wait Move Done Notes
Errors
A sequence error will occur if during the wait time:
The amplifier becomes hardware disabled.
The amplifier faults.
A software travel limit is reached or a hardware limit switch is activated.
A register used for a function parameter contains a value that is not valid for the parameter.
4.4 Wait for Delay Time
4.4.1 Wait for Delay Time Overview
Wait for Delay Time pauses execution of the sequence for the specified amount of time.
4.4.2 Adding a Wait for Delay Time Step to a Sequence
Click Add New Step  on the Program tab to open Indexer Functions.
Click Wait for Delay Time to select the function. Click Add to add it to the sequence. The Program tab displays the Wait for Delay Time parameters.
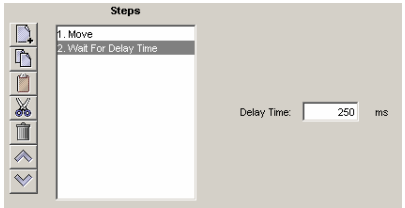
Enter the value directly or enter the number (R0-R31) of an Indexer 2 Program register. See Using Registers to Pass Values to Functions.
Wait for Delay Time – parameters
| Parameter | Description |
|---|---|
| Delay Time | The amount of time that the sequence will pause. Register units: ms. |
Original image of the table (from the PDF manual)

4.5 Wait for Event
4.5.1 Wait for Event Function Overview
Wait for Event pauses execution of the sequence until the specified event conditions are met.
4.5.2 Adding a Wait for Event Step to a Sequence
Click Add New Step  on the Program tab to open Indexer Functions.
Click Wait: Wait for Event to select the function. Click Add to add it to the sequence. The Program tab displays the Wait for Event parameters.
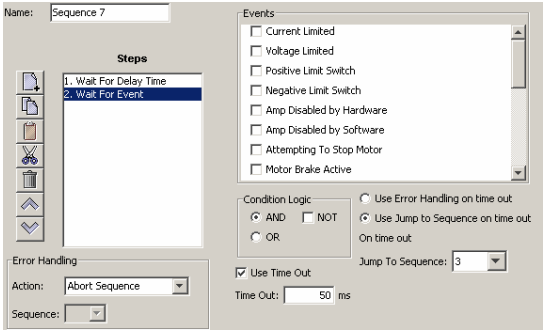
Select from the Events described on the next page. Set the condition logic and timeout controls described below as needed. Enter Time out time directly or enter the number (R0-R31) of an Indexer 2 Program register. See Using Registers to Pass Values to Functions.
Wait for Event – controls
| Control | Description |
|---|---|
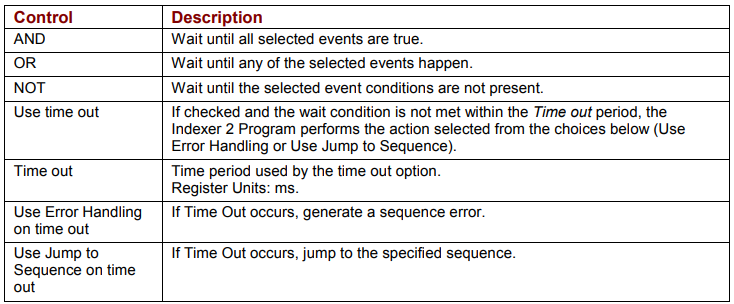
| AND | Wait until all selected events are true. |
| OR | Wait until any of the selected events happen. |
| NOT | Wait until the selected event conditions are not present. |
| Use time out | If checked and the wait condition is not met within the Time out period, the Indexer 2 Program performs the action selected from the choices below (Use Error Handling or Use Jump to Sequence). |
| Time out | Time period used by the time out option. Register Units: ms. |
| Use Error Handling on time out | If Time Out occurs, generate a sequence error. |
| Use Jump to Sequence on time out | If Time Out occurs, jump to the specified sequence. |
Original image of the table (from the PDF manual)
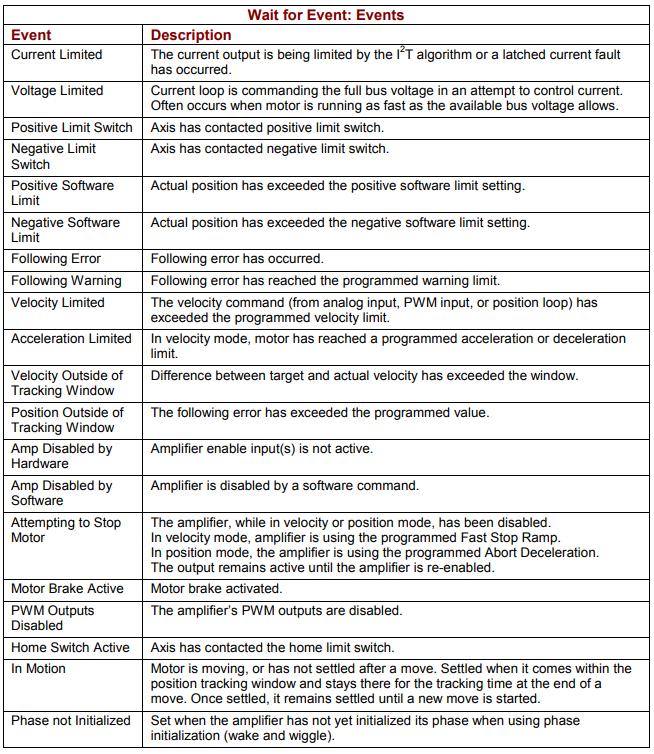
Wait for Event: Events
| Event | Description |
|---|---|
| Current Limited | The current output is being limited by the I²T algorithm or a latched current fault has occurred. |
| Voltage Limited | Current loop is commanding the full bus voltage in an attempt to control current. Often occurs when motor is running as fast as the available bus voltage allows. |
| Positive Limit Switch | Axis has contacted positive limit switch. |
| Negative Limit Switch | Axis has contacted negative limit switch. |
| Positive Software Limit | Actual position has exceeded the positive software limit setting. |
| Negative Software Limit | Actual position has exceeded the negative software limit setting. |
| Following Error | Following error has occurred. |
| Following Warning | Following error has reached the programmed warning limit. |
| Velocity Limited | The velocity command (from analog input, PWM input, or position loop) has exceeded the programmed velocity limit. |
| Acceleration Limited | In velocity mode, motor has reached a programmed acceleration or deceleration limit. |
| Velocity Outside of Tracking Window | Difference between target and actual velocity has exceeded the window. |
| Position Outside of Tracking Window | The following error has exceeded the programmed value. |
| Amp Disabled by Hardware | Amplifier enable input(s) is not active. |
| Amp Disabled by Software | Amplifier is disabled by a software command. |
| Attempting to Stop Motor | The amplifier, while in velocity or position mode, has been disabled. In velocity mode, amplifier is using the programmed Fast Stop Ramp. In position mode, the amplifier is using the programmed Abort Deceleration. The output remains active until the amplifier is re-enabled. |
| Motor Brake Active | Motor brake activated. |
| PWM Outputs Disabled | The amplifier’s PWM outputs are disabled. |
| Home Switch Active | Axis has contacted the home limit switch. |
| In Motion | Motor is moving, or has not settled after a move. Settled when it comes within the position tracking window and stays there for the tracking time at the end of a move. Once settled, it remains settled until a new move is started. |
| Phase not Initialized | Set when the amplifier has not yet initialized its phase when using phase initialization (wake and wiggle). |
Original image of the table (from the PDF manual)
4.5.3 Wait for Event Function Notes
Errors
A sequence error will occur if this function is executed when a register used for a function parameter contains a value that is not valid for the parameter.
4.6 Wait for Input Mask
4.6.1 Wait for Input Mask Function Overview
This function configures an Indexer 2 Program step to wait for the states of the amplifier’s digital inputs to match the specified mask before continuing to the next step.
4.6.2 Adding a Wait for Input Mask Step to a Sequence
Click Add New Step  on the Program tab to open Indexer Functions.
Click Wait: Wait for Input Mask to select the function. Click Add to add it to the sequence.
The Program tab displays the Wait for Input Mask parameters.
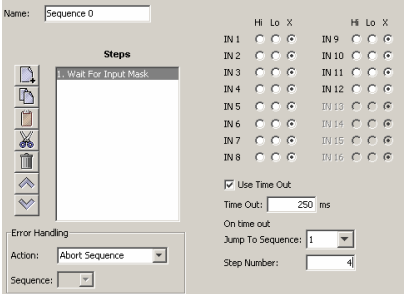
Choose appropriate values for the following parameters. Enter the Time out value directly or enter the number (R0-R31) of an Indexer 2 Program register. See Using Registers to Pass Values to Functions.
Wait for Input Mask – parameters
| Parameter | Description |
|---|---|
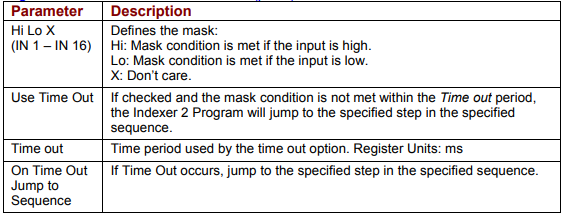
| Hi Lo X (IN 1 – IN 16) | Defines the mask: Hi – mask condition is met if the input is high; Lo – mask condition is met if the input is low; X – don’t care. |
| Use Time Out | If checked and the mask condition is not met within the Time out period, the Indexer 2 Program will jump to the specified step in the specified sequence. |
| Time out | Time period used by the time out option. Register Units: ms. |
| On Time Out Jump to Sequence | If Time Out occurs, jump to the specified step in the specified sequence. |
Original image of the table (from the PDF manual)
4.6.3 Wait for Input Mask Notes
Errors
A sequence error will occur if a register used for a function parameter contains a value that is not valid for the parameter.
4.7 Wait for Position
4.7.1 Wait for Position Overview
Wait for Position pauses execution of the sequence until the axis position meets the programmed criteria.
4.7.2 Adding a Wait for Position Step to a Sequence
Click Add New Step  on the Program tab to open Indexer Functions.
Click Wait: Wait for Position to select the function. Click Add to add it to the sequence.
The Program tab displays the Wait for Position parameters.
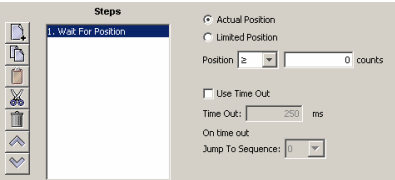
Choose appropriate values for the following parameters
Wait for Position – parameters
| Parameter | Description |
|---|---|
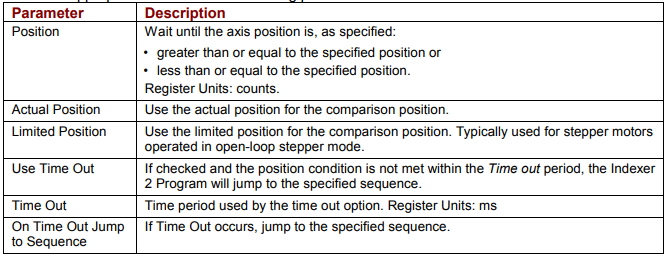
| Position | Wait until the axis position is, as specified: greater than or equal to the specified position, or less than or equal to the specified position. Register Units: counts. |
| Actual Position | Use the actual position for the comparison position. |
| Limited Position | Use the limited position for the comparison position. Typically used for stepper motors operated in open-loop stepper mode. |
| Use Time Out | If checked and the position condition is not met within the Time out period, the Indexer 2 Program will jump to the specified sequence. |
| Time Out | Time period used by the time out option. Register Units: ms. |
| On Time Out Jump to Sequence | If Time Out occurs, jump to the specified sequence. |
Original image of the table (from the PDF manual)
4.8 Wait for Input
4.8.1 Wait for Input Overview
Wait for Input pauses execution of the sequence until the specified input condition is met.
4.8.2 Adding a Wait for Input Step to a Sequence
Click Add New Step  on the Program tab to open Indexer Functions.
Click Wait for Input to select the function. Click Add to add it to the sequence.
The Program tab displays the Wait for Input parameters.
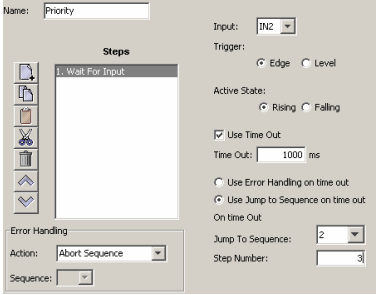
Choose appropriate values for the following parameters.
Wait for Input – parameters
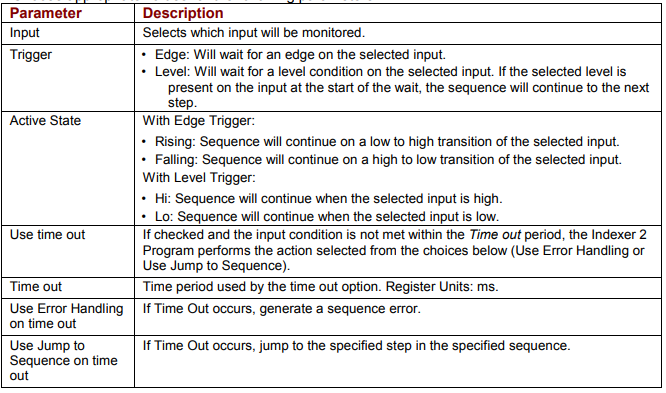
| Parameter | Description |
|---|---|
| Input | Selects which input will be monitored. |
| Trigger | Edge: Will wait for an edge on the selected input. Level: Will wait for a level condition on the selected input. If the selected level is present on the input at the start of the wait, the sequence will continue to the next step. |
| Active State | With Edge Trigger: Rising – sequence will continue on a low to high transition of the selected input; Falling – sequence will continue on a high to low transition of the selected input. With Level Trigger: Hi – sequence will continue when the selected input is high; Lo – sequence will continue when the selected input is low. |
| Use time out | If checked and the input condition is not met within the Time out period, the Indexer 2 Program performs the action selected from the choices below (Use Error Handling or Use Jump to Sequence). |
| Time out | Time period used by the time out option. Register Units: ms. |
| Use Error Handling on time out | If Time Out occurs, generate a sequence error. |
| Use Jump to Sequence on time out | If Time Out occurs, jump to the specified step in the specified sequence. |
Original image of the table (from the PDF manual)
4.9 Wait for Parameter
4.9.1 Wait for Parameter Overview
Wait for Parameter pauses execution of the sequence until the specified condition is met.
4.9.2 Adding a Wait for Parameter Step to a Sequence
Click Add New Step  on the Program tab to open Indexer Functions.
Click Wait for Parameter to select the function. Click Add to add it to the sequence.
The Program tab displays the Wait for Parameter parameters.
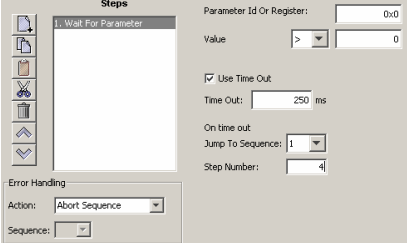
Choose appropriate values for the following parameters.
Wait for Parameter – parameters
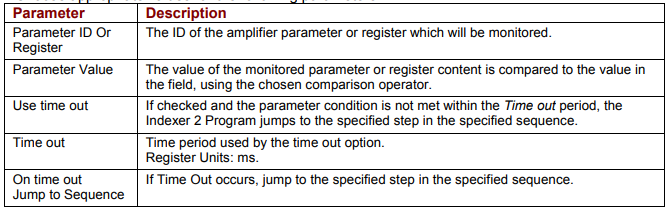
| Parameter | Description |
|---|---|
| Parameter ID Or Register | The ID of the amplifier parameter or register which will be monitored. |
| Parameter Value | The value of the monitored parameter or register content is compared to the value in the field, using the chosen comparison operator. |
| Use time out | If checked and the parameter condition is not met within the Time out period, the Indexer 2 Program jumps to the specified step in the specified sequence. |
| Time out | Time period used by the time out option. Register Units: ms. |
| On time out Jump to Sequence | If Time Out occurs, jump to the specified step in the specified sequence. |
Original image of the table (from the PDF manual)
4.9.3 Wait for Parameter Function Notes
For a list of parameter IDs, see the Copley Parameter Dictionary. Use the ASCII ID value. Parameter IDs can be entered as decimal or hexadecimal numbers, using the 0x notation (for instance, 0x00c1). When the Indexer 2 Program reloads, all values will show in decimal form.
Due to the finite scan time of this function, the “equal to operator” should not be used with rapidly changing parameters such as actual velocity or actual current. Instead, chose “equal to or greater than” or “equal to or less than”.
Errors
A sequence error will occur if:
The specified parameter ID does not exist.
The specified parameter ID is for a flash only parameter.
The specified parameter returns more than two words.
4.10 Set Current Limits
4.10.1 Set Current Limits Function Overview
The Set Current Limits function changes the current limits.
4.10.2 Adding an Set Current Limits Step to a Sequence
Click Add New Step  on the Program tab to open Indexer Functions.
Click Settings:Set Current Limits to select the function. Click Add to add it to the sequence.
The Program tab displays the Set Current Limits parameters.
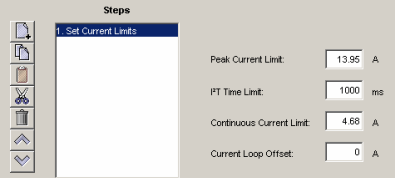
Choose appropriate values for the following parameters. Enter numeric values directly or enter the number (R0-R31) of an Indexer 2 Program register. See Using Registers to Pass Values to Functions
Set Current Limits – parameters
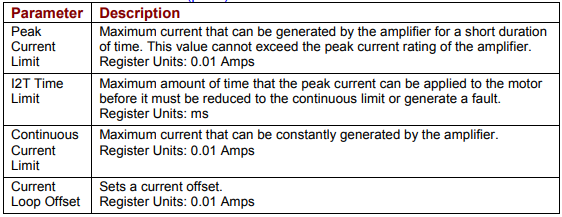
| Parameter | Description |
|---|---|
| Peak Current Limit | Maximum current that can be generated by the amplifier for a short duration of time. This value cannot exceed the peak current rating of the amplifier. Register Units: 0.01 Amps. |
| I2T Time Limit | Maximum amount of time that the peak current can be applied to the motor before it must be reduced to the continuous limit or generate a fault. Register Units: ms. |
| Continuous Current Limit | Maximum current that can be constantly generated by the amplifier. Register Units: 0.01 Amps. |
| Current Loop Offset | Sets a current offset. Register Units: 0.01 Amps. |
Original image of the table (from the PDF manual)
4.10.3 Set Current Limits Function Notes
Errors
A sequence error will occur if this function is executed when a register used for a function parameter contains a value that is not valid for the parameter.
4.11 Set Tracking Windows
4.11.1 Set Tracking Windows Function Overview
This function modifies the velocity and position tracking windows.
4.11.2 Adding a Set Tracking Windows Step to a Sequence
Click Add New Step  on the Program tab to open Indexer Functions.
Click Settings:Set Tracking Windows to select the function. Click Add to add it to the sequence.
The Program tab displays the Set Tracking Windows parameters.
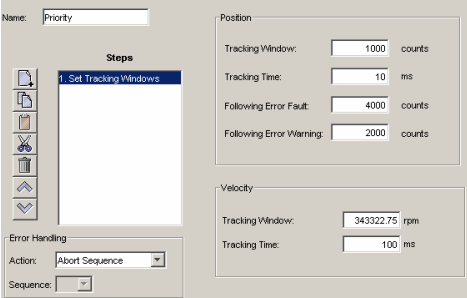
Choose appropriate values for the following parameters. Enter numeric values directly or enter the number (R0-R31) of an Indexer 2 Program register. See Using Registers to Pass Values to Functions
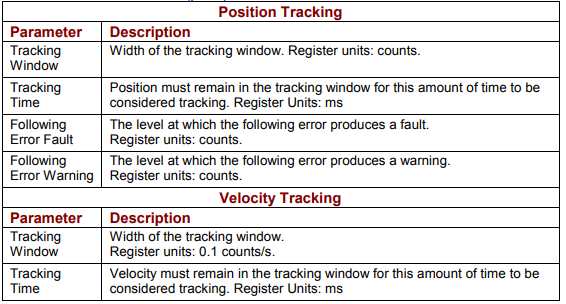
Set Tracking Windows – parameters
| Parameter | Description |
|---|---|
| Position Tracking | |
| Tracking Window | Width of the tracking window. Register units: counts. |
| Tracking Time | Position must remain in the tracking window for this amount of time to be considered tracking. Register Units: ms. |
| Following Error Fault | The level at which the following error produces a fault. Register units: counts. |
| Following Error Warning | The level at which the following error produces a warning. Register units: counts. |
| Velocity Tracking | |
| Tracking Window | Width of the tracking window. Register units: 0.1 counts/s. |
| Tracking Time | Velocity must remain in the tracking window for this amount of time to be considered tracking. Register Units: ms. |
Original image of the table (from the PDF manual)
4.11.3 Set Tracking Windows Function Notes
Errors
A sequence error will occur if this function is executed when a register used for a function parameter contains a value that is not valid for the parameter.
4.12 Set Gains
4.12.1 Set Gains Function Overview
This function sets new gain values for the current, velocity and position loops during a sequence. This can be used, for instance, when the load on the axis has been changed. The new values will stay in effect for all sequences until changed again by another Set Gains function or by an amplifier reset.
4.12.2 Adding a Set Gains Step to a Sequence
Click Add New Step  on the Program tab to open the Indexer Functions screen.
Click Set Gains to select the function. Click Add to add it to the sequence.
The Program tab displays the Set Gains parameters.
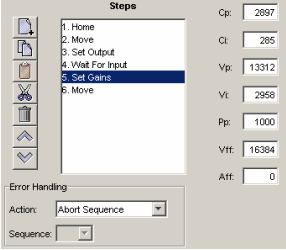
Choose appropriate values for the following parameters. Enter number values directly or enter the number (R0-R31) of an Indexer 2 Program register. See Using Registers to Pass Values to Functions
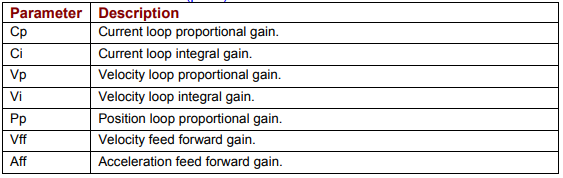
Set Gains – parameters
| Parameter | Description |
|---|---|
| Cp | Current loop proportional gain. |
| Ci | Current loop integral gain. |
| Vp | Velocity loop proportional gain. |
| Vi | Velocity loop integral gain. |
| Pp | Position loop proportional gain. |
| Vff | Velocity feed forward gain. |
| Aff | Acceleration feed forward gain. |
Original image of the table (from the PDF manual)
Słowa kluczowe
Wait Move Done, Wait for Delay Time, Wait for Event, Wait for Input Mask, Wait for Position, Wait for Input, Wait for Parameter, time out, Set Current Limits, Set Tracking Windows, Set Gains, rejestry, multi-axis