
Appendix A: ASCII Commands over Serial
Streszczenie: Sterowanie Indexer 2 komendami ASCII przez port szeregowy: połączenie jednoosiowe RS-232 i sieć multi-drop CAN (schematy z opisem tekstowym), protokół komunikacji, odczyt i zapis rejestrów komendą i (przykłady) oraz kody błędów.
EN: ASCII commands over serial: connections, protocol, reading/writing registers and error codes.
Dotyczy: serwonapędy Copley Controls z programem Indexer 2 (CVM), program CME 2
Źródło: dokumentacja producenta (Copley Controls Indexer 2 Program User’s Guide); tabele przepisane z obrazów na tekst – opracowanie Multiprojekt
The Indexer 2 Program provides 32 four-byte registers. They can be used to:
Select a sequence. See Use a Register to Select a Sequence.
Initiate a Go command. See Use a Register to Initiate Go.
Pass values to the Indexer 2 Program. See Using Registers to Pass Values to Functions.
This chapter describes how to set up connections for serial control and issue ASCII commands to access Indexer 2 Program registers
A.1 Connecting
This section describes how to connect an amplifier for control via the RS-232 bus. The serially connected amplifier can also be used as a multi-drop gateway for access to other amplifiers linked in a series of CAN bus connections. Instructions for hooking up a single-axis connection and a multi-drop network appear below.
A.1.1 Single-Axis Connections
For RS-232 serial bus control of a single axis, set the CAN node address of that axis to zero (0). Note that if the CAN node address is switched to zero after power-up, the amplifier must be reset or power cycled to make the new address setting take effect.

Diagram description (text version): RS-232 connection of a single amplifier: PC, PLC or HMI for ASCII control → serial COM port for RS-232 → 9-pin D-sub connector → SER-CK “Serial Cable Kit” → RJ11 connector of the Copley amplifier with ASCII over RS-232. The CAN ADDR switch is shown at 0 – the address must be set to zero before power-up or reset.
A.1.2 Multi-Drop Network Connections
A serially connected amplifier can be used as a multi-drop gateway for access to other amplifiers linked in a series of CAN bus connections. Set the CAN node address of the serially connected amplifier (gateway) to zero (0). Assign each additional amplifier in the chain a unique CAN node address value between 1 and 127. For more information on CAN node address assignment, see the CAN Network Configuration chapter in the CME 2 User Guide. Use 120 Ohms termination on the first and last amplifier.
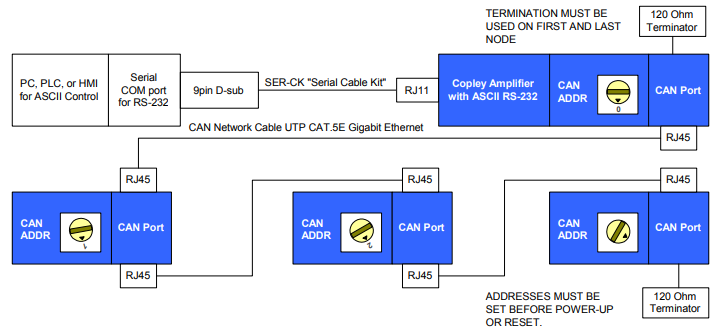
Diagram description (text version): Multi-drop network: the PC, PLC or HMI for ASCII control is connected through the serial COM port (RS-232), 9-pin D-sub and SER-CK “Serial Cable Kit” to the RJ11 port of the first Copley amplifier (ASCII over RS-232, CAN ADDR = 0). That amplifier is connected via its CAN port (RJ45) and CAN network cable (UTP CAT.5E Gigabit Ethernet) to further amplifiers in a daisy chain (RJ45 in/out on each CAN port), each with its own CAN ADDR switch setting. A 120 Ohm terminator must be used on the first and last node. Addresses must be set before power-up or reset.
A.2 Communications Protocol
Use the following protocol for reading and writing Indexer 2 Program registers:
A.3 Reading and Writing Registers
To read or write the Indexer 2 Program’s 32 registers with Copley ASCII commands, use the “i” (for Indexer) command with the “r” (for register) argument as shown here:
[optional node ID] i rn [optional write value] where:
[optional node ID] is the CAN node address of an amplifier in a multi-drop network. Range is 0-127. The node ID should be followed by a single space. If omitted, the serially connected amplifier is addressed by default.
i rn is the command code for accessing the Indexer 2 Program registers. Lowercase ASCII character i followed by a single space followed by r followed by a number n, where n is the number of the register to read or write. Range 0-31.
[optional write value] is the value to write to the register. A space is required between the register number and this value. If no value is entered, the command returns the value in the specified register. The value can be entered as a positive or negative integer or in hex format.
<cr> is a carriage return charter that ends the command line.
If a write command was accepted by the Indexer 2 Program, it returns an "ok" followed by a carriage return character. If a read command was accepted by the amplifier, it returns an "r " followed by the decimal equivalent of the registers value followed by a carriage return character. Examples:
Examples of register commands over serial
| Operation | Command | Response |
|---|---|---|
| Read R31 via direct serial connection | i r31<cr> | r [register contents]<cr> |
| Write value 500 to R0 via direct serial connection | i r0 500<cr> | ok<cr> |
| Write value -500 to R31 via direct serial connection | i r31 -500<cr> | ok<cr> |
| Read R0 on CAN node amplifier #15 on a multi-drop network | 15 i r0<cr> | r [register contents]<cr> |
| Write hex value 800d to R31 on CAN node amplifier #15 on a multi-drop network | 15 i r31 0x800d<cr> | ok<cr> |
If there was a problem with a command, the amplifier returns an "e" followed by an error code followed by a carriage return character. Error codes
Error codes
| Code | Meaning |
|---|---|
| 10 | The passed data value is out of range. |
| 31 | Invalid node ID. |
| 32 | CAN network communications failure. |
| 33 | ASCII command parse error. |
| 34 | Internal amplifier error. |
Note that all register values are cleared when the Indexer 2 Program starts. For experimentation and simple setup and control, the CME 2 ToolsASCII Command Line tool can be used. In addition, a telnet device such as the standard Microsoft Windows HyperTerminal can be used to send commands in ASCII format. Use the protocol described in Communications Protocol
Słowa kluczowe
ASCII, RS-232, multi-drop, CAN, i r0, odczyt rejestru, zapis rejestru, kody błędów, SER-CK, node ID
No comments to display
No comments to display