
8. Device Settings – Part 1 (Image Quality)
Streszczenie: Ustawienia ID3000 cz. 1: zalecana kolejność konfiguracji oraz jakość obrazu – ekspozycja, wzmocnienie, Gamma, polling (tryb single/multiple), źródło światła, ostrość obiektywu, samoczynne dopasowanie, Mirror X i obraz testowy.
EN: ID3000 settings part 1: configuration order and image quality – exposure, gain, Gamma, polling, light source, lens focus, self-adaptive adjustment, Mirror X and test pattern.
Dotyczy: przemysłowy czytnik kodów Hikrobot serii ID3000 (złącze M12 17-pin, Fast Ethernet, RS-232; obsługa przez klienta IDMVS)
Źródło: dokumentacja producenta (Hikrobot ID3000 Series Industrial Code Reader User Manual, V3.1.0); opisy rysunków – opracowanie Multiprojekt
You are recommended to complete device settings in following order: Device Connection → Image Settings → Algorithm Settings → I/O Control Settings → Data Processing → Communication Settings → Configuration Management.
Note: Before specific device settings, you need to set device mode as Normal. Otherwise, the device parameters may be different. Regarding device mode, refer to Device Mode Settings for details.
- Device Connection: It tells you how to connect the device to the client software. And you can configure and operate the device remotely via the client software only when you have connected the device to the client software. Refer to Connect Device to Client Software for details.
- Image Settings: It tells you how to set image related parameters of the device via client software. Refer to Image Quality Settings for details.
- Algorithm Settings: It tells you how to set the types of barcode to be read, the 1D code algorithm, the 2D code algorithm, etc. Refer to Code Algorithm Settings for details.
- I/O Control Settings: It tells you how to set the parameters related to the control of input and output signals of device. Refer to Signal Input Settings and Signal Output Settings for details.
- Data Processing: It tells you how to set filter rules for reading barcodes and other data processing related parameters. Refer to Code Reading Result Settings for details.
- Communication Settings: It tells you how to select different communication protocols, and set their corresponding parameters. Refer to Communication Settings for details.
- Configuration Management: It tells you how to set and manage the user parameters, restart device, etc. Refer to User Set Customization for details.
8.1 Image Quality Settings
This section introduces how to set image related parameters of the device via client software.
Note: For different models of the device, the specific parameters may differ, and the actual device you purchased shall prevail.
8.1.1 Set Image
You can set different image parameters like exposure time, gain, Gamma, acquisition frame rate, acquisition burst frame count in image parameters interface.
Note:
- Make sure you have selected the device to be set in Device Connection before setting image parameters.
- For specific parameter range like exposure time, gain and acquisition frame rate, refer to the device’s specification for details.
Exposure Time
You can increase exposure time to improve image brightness.
Note: To some extent, increasing exposure time will reduce acquisition frame rate, and impact image quality.
Gain
You can increase gain to improve image brightness.
Note: To some extent, increasing gain will create more image noises, and impact image quality.
Gamma
Gamma allows you to adjust the image contrast. It is recommended to reduce Gamma to increase brightness in dark background.
Acquisition Frame Rate
Acquisition frame rate refers to the image number that is acquired by the device per second.
Acquisition Burst Frame Count
Acquisition burst frame count refers to the outputted image number when the device is triggered once.
Polling Enable
It enables the polling function, you can select off, single or multiple mode.
Note: The parameter of polling enable will be displayed only when the trigger mode is on.
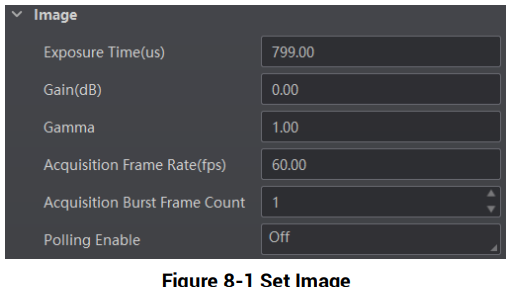
Figure 8-1 Set Image
Figure description (text version): Image parameter group with example values: Exposure Time (us) 799.00, Gain (dB) 0.00, Gamma 1.00, Acquisition Frame Rate (fps) 60.00, Acquisition Burst Frame Count 1, Polling Enable Off.
8.1.2 Set Polling
The polling function allows the device to acquire images based on the parameters you set, including exposure time, gain, Gamma, and light source. Currently, 2 types of polling modes are available, including single mode and multiple mode.
Single Mode
Note:
- Stopping the real-time acquisition is required before setting the polling function.
- After the polling is enabled, the device acquires images with its max. frame rate. Once the polling is disabled, the frame rate you set in Acquisition Frame Rate takes effect.
- The polling function, specific parameters as well as parameter values may differ by device models.
Steps
- Go to Image Settings → Image → Polling Enable, and select Single as Polling Enable.
- Select one parameter (e.g. Param1) from Polling Param.
- Set Polling Exposure Time, Polling Gain, and Polling Gamma according to actual demands
- Select Polling Light Selector according to actual demands, and enable Polling Light Enable.
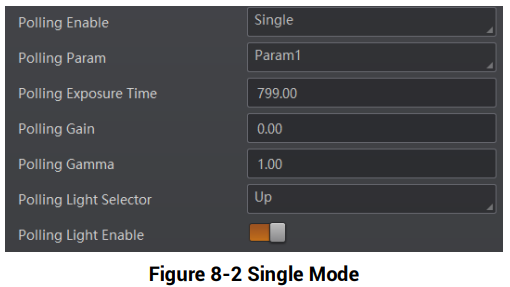
Figure 8-2 Single Mode
Figure description (text version): Polling parameters in single mode: Polling Enable Single, Polling Param Param1, Polling Exposure Time 799.00, Polling Gain 0.00, Polling Gamma 1.00, Polling Light Selector Up, Polling Light Enable switched on.
Multiple Mode
Note:
- The parameter of Best Polling Group Idx is used to display the polling parameter number when the device recognizes codes after enabling polling. If the polling is disabled or polling parameters are edited, it displays 1 by default.
- The rule for multiple-mode polling is that the polling is started from the polling parameter with Best Polling Group Idx, and then other polling parameters you selected are executed in turn. For example, if Param3 is the Best Polling Group Idx and Param1, Param2, Param4 and Param5 are enabled, the polling order is Param3 > Param1 > Param2 > Param4 > Param5.
Steps
- Go to Image Settings → Image → Polling Enable, and select Multiple as Polling Enable.
- Set Polling Time and Polling Period according to actual demands.
- Select 2 to 8 sets of parameters (e.g. Param1 and Param2) from Polling Param, and enable Polling Param Enable to let them take effect.
- Set Polling Exposure Time, Polling Gain, and Polling Gamma for the Polling Param you selected.
- Select Polling Light Selector according to actual demands, and enable Polling Light Enable.
- Repeat step 3 to step 5 to set other parameters from Polling Param.
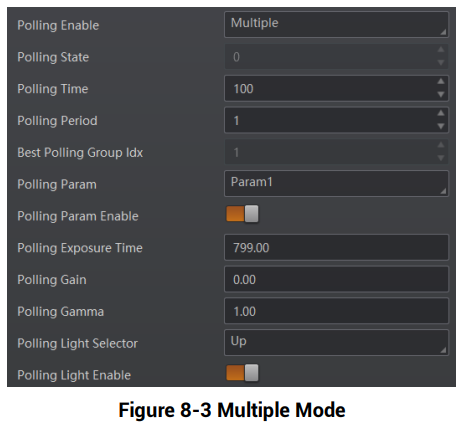
Figure 8-3 Multiple Mode
Figure description (text version): Polling parameters in multiple mode: Polling Enable Multiple, Polling State 0, Polling Time 100, Polling Period 1, Best Polling Group Idx 1, Polling Param Param1, Polling Param Enable on, Polling Exposure Time 799.00, Polling Gain 0.00, Polling Gamma 1.00, Polling Light Selector Up, Polling Light Enable on.
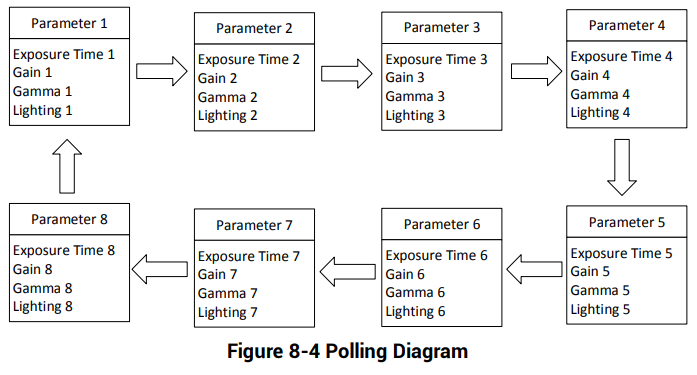
Figure 8-4 Polling Diagram
Figure description (text version): Loop diagram of eight parameter sets (Parameter 1 … Parameter 8), each containing its own exposure time, gain, Gamma and lighting. Arrows run Parameter 1 → 2 → 3 → 4 → 5 → 6 → 7 → 8 and back to Parameter 1.
8.1.3 Set Light Source
You can select different light types, and set their related parameters in the light interface.
Note:
- Light source parameters may differ by device models.
- Make sure you have selected the device to be set in Device Connection before setting light source parameters.
You can select different light sources in Light Type.
Own Lighting
It refers to use the device's embedded light source to light during code reading.
External Lighting
It refers to the device controls the external light source by triggering output signal during code reading.
Non-Lighting
It refers to the device turns off light source during code reading.
Note: If you select Non-Lighting as Light Type, you do not need to set any parameters.
Set Own Lighting
If you select Own Lighting as Light Type, you can set the following parameters.
Aiming Light Enable
You can enable Aiming Light Enable to enable the device’s aiming light.
Note: The parameter of aiming light enable may differ by device model.
Lighting Selector
You can click lamps on the light source illustration to turn on or turn off lamps on different directions.
Note: The specific lighting selector may differ by device model. For devices with 4 groups of lamps, you can check All to turn on all lamps. For devices with 6 groups of lamps, you can click All On or All Off to turn on or turn off all lamps.
Light Mode
It has 2 light modes, including Strobe and Long. Strobe means the light flashes at a specific interval during code reading, and Long means the light is solid during code reading.
Lighting Duration
It sets the lighting duration and the unit is μs.
Lighting Delay Time
Note: This parameter is available only when you set Flash Strobe as the Light Mode.
It determines the delay time for lighting after exposure and the unit is μs.
Precharge Time
It determines how earlier the light source starts lighting before exposure and the unit is μs.
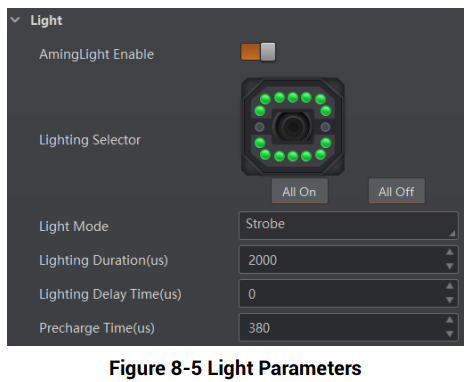
Figure 8-5 Light Parameters
Figure description (text version): Light parameter group: Aiming Light Enable switch, Lighting Selector with an illustration of the device front and its LED lamps (green = on) plus All On / All Off buttons, Light Mode Strobe, Lighting Duration (us) 2000, Lighting Delay Time (us) 0, Precharge Time (us) 380.
Note: The figure above is only for reference. The specific graphic user interface may differ by device models.
Set External Lighting
If you select External Lighting as Light Type, you can set the following parameters.
Line Out Duration
The lighting duration of the external light source and the unit is μs.
Line Out Delay Time
It sets the delay time for lighting after device outputs event source, and the unit is μs.
Line Out Ahead Time
It sets how earlier the external light starts lighting before the device outputs event source information, and the unit is μs.
8.1.4 Set Lens Focus
The device supports setting lens focus via the client software. 2 ways are available to set lens focus, including auto focus and manual focus.
Note:
- The lens focus function may differ by device models.
- Setting the device mode as Test is required before setting lens focus. After completion, you can set the device mode as Normal.
- Setting the trigger mode as off is required before setting lens focus.
Auto Focus
Steps
- Click
 in the live view window.
- Go to Image Settings → Auto Focus, and click Execute in Focus Mode.
The device starts to adjust focus automatically. - Select the position parameter from Focus Position, and click Execute in Focus Position Save to save the focus position.
- (Optional) Select the position parameter from Focus Position, and click Execute in Focus Position Load to load saved focus position.
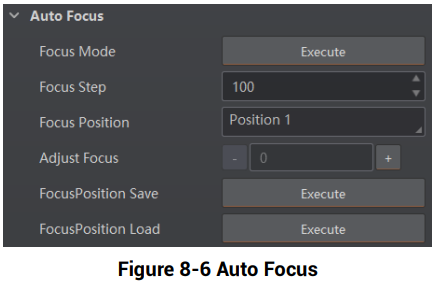
Figure 8-6 Auto Focus
Figure description (text version): Auto Focus group: Focus Mode (Execute), Focus Step 100, Focus Position Position 1, Adjust Focus with − / + buttons, FocusPosition Save (Execute), FocusPosition Load (Execute).
Manual Focus
- Go to Image Settings → Auto Focus, and set Focus Step according to actual demands.
- Click − or + in Adjust Focus to adjust focus.
- Select the position parameter from Focus Position, and click Execute in Focus Position Save to save the focus position.
- (Optional) Select the position parameter from Focus Position, and click Execute in Focus Position Load to load saved focus position.
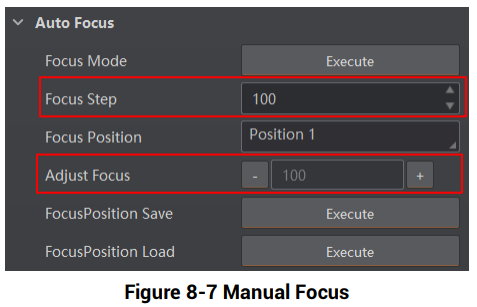
Figure 8-7 Manual Focus
Figure description (text version): The same Auto Focus group with Focus Step (100) and Adjust Focus (− / + buttons) highlighted in red for manual focusing.
8.1.5 Set Self-Adaptive Adjustment
Note: This function may differ by device models.
The function of self-adaptive adjustment can automatically adjust exposure, gain, Gamma and other parameters to have a better code reading effect.
Steps
- Right click the device in Device Connection, and click Feature Tree.
- Go to Self Adapt Adjust, and select Adjust Mode.
- High Quality: In this mode, the client software will adjust exposure in priority with small gain and noise. The image quality is high, and this mode is applicable to the scenario for low speed conveyer belt.
- High Speed: In this mode, the client software will adjust gain in priority with small exposure and large gain. The image quality is less high, and this mode is applicable to the scenario for high speed conveyer belt.
- Select Param Source according to actual demands.
- Default Param: It adjusts the default parameters.
- Polling Param: It adjusts parameters configured in polling.
- (Optional) Enable or disable Lighting Adapt during self-adaptive adjustment. If it is enabled, the client software will select the best one from all lighting options during the self-adaptive adjustment. If it is disabled, the client software will keep the lighting status before the self-adaptive adjustment.
- (Optional) Set Gain Max or Exposure Max according to actual demands.
- Gain Max: It is enabled in high quality mode, and it sets the max. gain during the self-adaptive adjustment.
- Exposure Max: It is enabled in high speed mode, and it sets the max. exposure during the self-adaptive adjustment.
- (Optional) You can set Adjust Timeout to set the duration of the self-adaptive adjustment, and the adjustment will stop if the duration is exceeded. The unit of Adjust Timeout is second.
- Click Execute in Adjust Start. The device will automatically acquire images and perform self-adaptive adjustment, and stop acquisition after adjustment is completed.
Note: If the adjustment is completed, the client software displays the spent time and prompts that the adjustment succeeded. If the adjustment failed or timed out, the client software prompts adjustment failure or timeout.
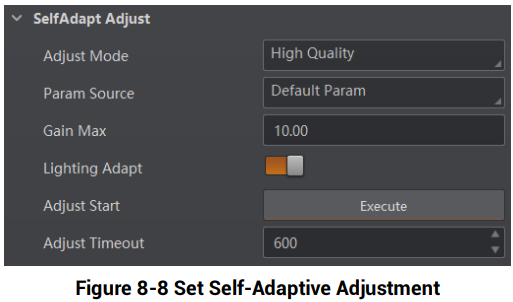
Figure 8-8 Set Self-Adaptive Adjustment
Figure description (text version): SelfAdapt Adjust group: Adjust Mode High Quality, Param Source Default Param, Gain Max 10.00, Lighting Adapt switched on, Adjust Start (Execute), Adjust Timeout 600.
8.1.6 Set Mirror X
The device supports the mirror X function. If this function is enabled, the image will be reversed in a horizontal way.
Go to Image Settings, click All Features, and you can see the Mirror X.
Note: This function is enabled by default, and it may differ by device models.
8.1.7 Set Test Pattern
Test pattern helps troubleshooting image problems and images in the test pattern are only for test. When exceptions occur in images acquired by the device in real time, you can check if images in the test pattern have similar problems to determine the cause of an exception.
Note:
- The test pattern is available in the test or raw device mode.
- Specific parameters of this function may differ by device models.
Go to Image Settings, click All Features, find Test Pattern in Other Features, and set Test Pattern according to actual demands.
Słowa kluczowe
Hikrobot ID3000, image settings, exposure time, gain, Gamma, acquisition frame rate, burst frame count, polling, light source, aiming light, strobe, lens focus, auto focus, self-adaptive adjustment, mirror X, test pattern