
3. Mechanical and Electric Installation
Streszczenie: Instalacja mechaniczna i elektryczna KE600: odstępy montażowe, dobór wyłączników, styczników i przewodów, urządzenia peryferyjne, schemat połączeń z kartą PG, zaciski obwodu głównego i sterowania, okablowanie NPN/PNP.
EN: KE600 mechanical and electrical installation: mounting clearances, selection of breakers, contactors and cables, peripheral devices, wiring diagram with PG card, main circuit and control terminals, NPN/PNP wiring.
Dotyczy: falownik wektorowy z zamkniętą pętlą Micno KE600 (zasilanie 3AC 220 V, 3AC 380 V, 3AC 660 V; moce 1,5–630 kW)
Źródło: dokumentacja producenta (Micno KE600 Series Inverter User Manual); tabele przepisane z obrazów na tekst, opisy rysunków – opracowanie Multiprojekt
3.1 Mechanical Installation
3.1.1 Installation Environment
- Ambient temperature: The ambient temperature exerts great influences on the service life of the inverter and is not allowed to exceed the allowable temperature range (-10℃ to 50℃).
- The inverter should be mounted on the surface of incombustible articles, with sufficient spaces nearby for heat sinking. The inverter is easy to generate large amount of heat during the operation. The inverter should be mounted vertically on the base with screws.
- The inverter should be mounted in the place without vibration or with vibration of less than 0.6G, and should be kept away from such equipment as punching machine.
- The inverter should be mounted in locations free from direct sunlight, high humidity and condensate.
- The inverter should be mounted in locations free from corrosive gas, explosive gas or combustible gas.
- The inverter should be mounted in locations free from oil dirt, dust, and metal powder.
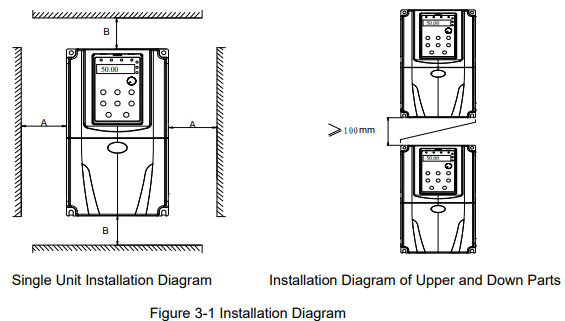
Diagram description (text version): Figure 3-1 Installation diagram. Left (single unit installation): clearance A to the side walls and clearance B above and below the inverter. Right (installation of upper and lower units): when two inverters are mounted one above the other, keep at least 100 mm between them (a deflector plate between the units is shown). Required A and B values are given in the table below.
Single Unit Installation: When the inverter power is not higher than 22kW, the A size can be omitted. When the inverter power is higher than 22kW, the A size should be higher than 50mm.
Installation of Upper and Lower Parts: When installing the upper and lower parts of the inverter, the insulating splitter is required.
| Power rating | Mounting dimension B | Mounting dimension A |
|---|---|---|
| ≤ 15 kW | ≥ 100 mm | ≥ 50 mm |
| 18.5 ~ 30 kW | ≥ 200 mm | ≥ 50 mm |
| ≥ 37 kW | ≥ 300 mm | ≥ 50 mm |
3.1.2 Heat Dissipation
Heat dissipation should be taken into account during the mechanical installation. Please pay attention to the following items:
- Install the inverter vertically so that the heat may be expelled from the top. However, the equipment cannot be installed upside down. If there are multiple inverters, parallel installation is a better choice. In applications where the upper and lower inverters need to be installed, please refer to Figure 3-1 “KE600 Series Inverter Installation Diagram” and install an insulating splitter.
- The mounting space should be as indicated as Figure 3-1, so as to ensure the heat dissipation space of the inverter. However, the heat dissipation of other devices in the cabinet should also be taken into account.
- The installation bracket must be flame retardant.
- In the applications where there are metal dusts, it is recommended to mount the radiator outside the cabinet. In this case, the space in the sealed cabinet should be large enough.
3.2 Electrical Installation
3.2.1 Guide to the External Electrical Parts
Table 3-1 Selection guide of external electrical parts of KE600 series inverter
| Inverter model | Circuit breaker MCCB (A) | Recommended contactor (A) | Main circuit wire, input side (mm²) | Main circuit wire, output side (mm²) | Control circuit wire (mm²) |
|---|---|---|---|---|---|
| 3AC 220–240V | |||||
| KE600-1R5G-T2 | 16 | 10 | 2.5 | 2.5 | 1.0 |
| KE600-2R2G-T2 | 25 | 16 | 4.0 | 4.0 | 1.0 |
| KE600-004G-T2 | 32 | 25 | 4.0 | 4.0 | 1.0 |
| KE600-5R5G-T2 | 63 | 40 | 4.0 | 4.0 | 1.0 |
| KE600-7R5G-T2 | 63 | 40 | 6.0 | 6.0 | 1.0 |
| KE600-011G-T2 | 100 | 63 | 10 | 10 | 1.5 |
| KE600-015G-T2 | 125 | 100 | 16 | 10 | 1.5 |
| KE600-018G-T2 | 160 | 100 | 16 | 16 | 1.5 |
| KE600-022G-T2 | 200 | 125 | 25 | 25 | 1.5 |
| KE600-030G-T2 | 200 | 125 | 35 | 25 | 1.5 |
| KE600-037G-T2 | 250 | 160 | 50 | 35 | 1.5 |
| KE600-045G-T2 | 250 | 160 | 70 | 35 | 1.5 |
| KE600-055G-T2 | 350 | 350 | 120 | 120 | 1.5 |
| KE600-075G-T2 | 500 | 400 | 185 | 185 | 1.5 |
| 3AC 380–440V | |||||
| KE600-1R5G-T4 | 16 | 10 | 2.5 | 2.5 | 1.0 |
| KE600-2R2G-T4 | 16 | 10 | 2.5 | 2.5 | 1.0 |
| KE600-004G-T4 | 25 | 16 | 4.0 | 4.0 | 1.0 |
| KE600-5R5G-T4 | 32 | 25 | 4.0 | 4.0 | 1.0 |
| KE600-7R5G-T4 | 40 | 32 | 4.0 | 4.0 | 1.0 |
| KE600-011G-T4 | 63 | 40 | 4.0 | 4.0 | 1.0 |
| KE600-015G-T4 | 63 | 40 | 6.0 | 6.0 | 1.0 |
| KE600-018G-T4 | 100 | 63 | 6.0 | 6.0 | 1.5 |
| KE600-022G-T4 | 100 | 63 | 10 | 10 | 1.5 |
| KE600-030G-T4 | 125 | 100 | 16 | 10 | 1.5 |
| KE600-037G-T4 | 160 | 100 | 16 | 16 | 1.5 |
| KE600-045G-T4 | 200 | 125 | 25 | 25 | 1.5 |
| KE600-055G-T4 | 200 | 125 | 35 | 25 | 1.5 |
| KE600-075G-T4 | 250 | 160 | 50 | 35 | 1.5 |
| KE600-090G-T4 | 250 | 160 | 70 | 35 | 1.5 |
| KE600-110G-T4 | 350 | 350 | 120 | 120 | 1.5 |
| KE600-132G-T4 | 400 | 400 | 150 | 150 | 1.5 |
| KE600-160G-T4 | 500 | 400 | 185 | 185 | 1.5 |
| KE600-200G-T4 | 600 | 600 | 2 × 150 | 2 × 150 | 1.5 |
| KE600-220G-T4 | 600 | 600 | 2 × 150 | 2 × 150 | 1.5 |
| KE600-250G-T4 | 800 | 600 | 2 × 185 | 2 × 185 | 1.5 |
| KE600-280G-T4 | 800 | 800 | 2 × 185 | 2 × 185 | 1.5 |
| KE600-315G-T4 | 800 | 800 | 3 × 150 | 3 × 150 | 1.5 |
| KE600-350G-T4 | 800 | 800 | 4 × 150 | 4 × 150 | 1.5 |
| KE600-400G-T4 | 1000 | 1000 | 4 × 150 | 4 × 150 | 1.5 |
| KE600-500G-T4 | 1200 | 1200 | 4 × 180 | 4 × 180 | 1.5 |
| KE600-560G-T4 | 1200 | 1200 | 4 × 180 | 4 × 180 | 1.5 |
| KE600-630G-T4 | 1500 | 1500 | 4 × 180 | 4 × 180 | 1.5 |
“2 × 150” means two parallel conductors of 150 mm² each.
3.2.2 Connection to Peripheral Devices
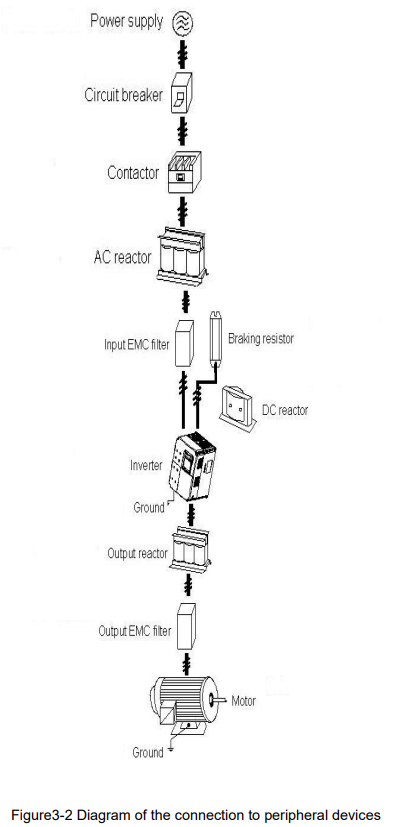
Diagram description (text version): Figure 3-2 Diagram of the connection to peripheral devices, from top to bottom: power supply → circuit breaker → contactor → AC (input) reactor → input EMC filter → inverter (grounded); a braking resistor and a DC reactor are connected to the inverter as options; inverter output → output reactor → output EMC filter → motor (grounded).
- Do not install the capacitor or surge suppressor at the output side of the inverter, otherwise it may cause inverter failure or capacitor and surge suppressor damaged.
- The Inverter input / output (main circuit) contains harmonic components, it may interfere with inverter accessories communications equipment. Therefore, please install anti-interference filter to minimize interference.
- The details of external devices and accessories selection refer to the manual of external devices.
3.2.3 Using Instruction of the External Electrical Parts
Table 3-2 Using instruction of the external electrical parts
| Part name | Installing location | Function description |
|---|---|---|
| Circuit breaker | Front end of input circuit | Disconnect the power supply when the equipment at the lower part is over current. |
| Contactor | Between the circuit breaker and the inverter input side | Connection and disconnection of inverter. Frequent power-on and power-off operations on the inverter should be avoided. |
| AC input reactor | Input side of the inverter | Improve the power factor of the input side; Eliminate the higher harmonics of the input side effectively and prevent other equipment from damage due to distortion of voltage wave; Eliminate the input current unbalance due to unbalance between the power phases. |
| EMC input filter | Input side of the inverter | Reduce the external conduction and radiation interference of the inverter; Decrease the conduction interference flowing from the power end to the inverter and improve the anti-interference capacity of the inverter. |
| DC reactor | DC reactor is optional for inverters above 18.5 kW | Improve the power factor of the input side; Improve the whole efficiency and thermal stability of the inverter; Eliminate the impact of higher harmonics of the input side on the inverter and reduce the external conduction and radiation interference. |
| AC output reactor | Between the inverter output side and the motor, close to the inverter | The inverter output side generally has higher harmonics. When the motor is far from the inverter, since there are many distributed capacitors in the circuit, certain harmonics may cause resonance in the circuit and bring about the following two impacts: – degrade the motor insulation performance and damage the motor in the long run; – generate large leakage current and cause frequent inverter protection. In general, when the distance between the inverter and the motor exceeds 100 meters, installation of an output AC reactor is recommended. |
3.2.4 Wiring Diagram
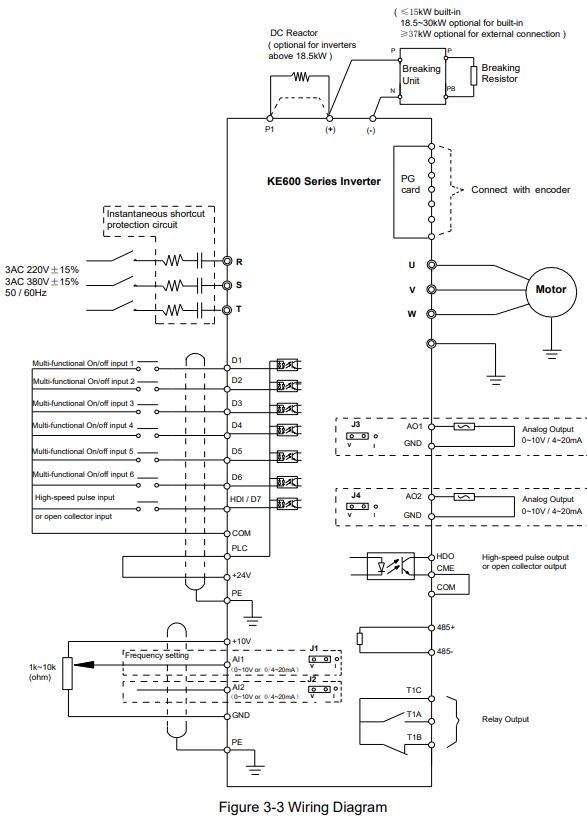
Diagram description (text version): Figure 3-3 Wiring diagram of KE600: mains 3AC 220V ±15% or 3AC 380V ±15%, 50/60 Hz to R, S, T (with an instantaneous short-circuit protection circuit); motor on U, V, W and grounded. DC side: optional DC reactor between P1 and (+) for inverters above 18.5 kW; braking unit and braking resistor (labelled “Breaking” in the figure) connected to (+) and (−) – built-in for ≤ 15 kW, optional built-in for 18.5–30 kW and external for ≥ 37 kW. A PG card connects the encoder (close-loop vector control). Control side: multi-functional on/off inputs 1–6 on D1–D6 and a high-speed pulse or open-collector input on HDI/D7, COM, PLC, +24V, PE. Frequency setting: 1–10 kΩ potentiometer on +10V/AI1/GND; analog inputs AI1 and AI2 (0–10 V or 0/4–20 mA, jumpers J1 and J2). Outputs: analog outputs AO1 and AO2 to GND, 0–10 V / 4–20 mA (jumpers J3, J4); high-speed pulse or open-collector output HDO–CME (CME linked to COM); RS485 on 485+/485-; relay output T1A/T1B/T1C.
Note:
- Terminal ◎ refers to the main circuit terminal, terminal ○ refers to the control circuit terminal.
- Built-in braking unit is standard in the inverters below 18.5kW, and optional for 18.5 ~ 30kW inverters.
- Braking resistor is optional for user.
3.2.5 Main Circuit Terminals and Connections
DANGER:
• Make sure that the power switch is in OFF status prior to performing wiring connection. Otherwise there may be danger of electric shock!
• Only qualified and trained personnel can perform wiring connection. Otherwise it may cause equipment damage and human injuries!
• It should be earthed reliably. Otherwise there may be danger of electric shock or fire!
CAUTION:
• Make sure that the rated value of the input power supply is consistent with that of the inverter. Otherwise it may damage the inverter!
• Make sure that the motor matches the inverter. Otherwise it may damage the motor or generate inverter protection!
• Do not connect the power supply to the terminals U, V and W. Otherwise it may damage the inverter!
• Do not directly connect the brake resistor between the DC bus terminals (+) and (-). Otherwise it may cause fire!
1) Main Circuit Terminals
| Figure | Inverter | Main circuit terminal order (left to right) |
|---|---|---|
| Figure 3-4 | Three phase 380V, 1.5–5.5 kW | (+), (−), PB, R, S, T, U, V, W, ⏚ |
| Figure 3-5 | Three phase 380V, 7.5–15 kW | ⏚, (+), (−), PB, R, S, T, U, V, W, ⏚ |
| Figure 3-6 | Three phase 380V, 18.5–30 kW | ⏚, R, S, T, (+), (−), PB, U, V, W, ⏚ |
| Figure 3-7 | Three phase 380V, 37–75 kW | R, S, T, P1, (+), (−), U, V, W; ground terminals ⏚ below at both ends |
| Figure 3-8 | Three phase 380V, 90–710 kW | Upper row: R, S, T, P1, (+), (−); lower row: ⏚, U, V, W, ⏚ |
2) Instructions of Main Circuit Terminals
| Terminal | Name | Description |
|---|---|---|
| R, S, T | Input terminals of three phase power supply | Connect to three-phase AC power |
| (+), (−) | Positive and negative terminals of DC bus | Common DC bus input point (connection point of external brake unit of the inverter (220V and other voltages) above 18.5 kW) |
| PB, (+) | Connection terminals of brake resistor | Connection point of brake resistor of the inverter below 15 kW (220V) and the inverter below 18.5 kW (other voltages) |
| P1, (+) | Connection terminals of external DC reactor | Connection point of external DC reactor |
| U, V, W | Output terminals of inverter | Connect to the three phase motor |
| ⏚ | Earth terminal | Earth connection terminal |
Precautions on Wiring:
a) Input power R, S and T:
There is no phase sequence requirement for the cable connection at the input side of the inverter.
b) DC bus (+) and (-) terminals:
Note that the (+) and (-) terminals of DC bus have residual voltage right after power-on. It needs to wait until the CHARGE indictor is OFF and make sure that the voltage is less than 36V prior to wiring connection. Otherwise there may be danger of electric shock.
When selecting external brake unit for the inverter above 18.5kW, the poles of (+) and (-) should not be connected reversely, or it may damage the inverter and even cause fire.
The wiring length of the brake unit should not exceed 10 meters. Twisted wires or pair wires should be used and connected in parallel.
Do not connect the brake resistor directly to the DC bus, or it may damage the inverter and even cause fire.
c) Connecting terminals (+) and PB of brake resistor:
The connecting terminals of the brake resistor are effective only for the inverter of less than 30kW with built-in brake unit.
The prototype of brake resistor can refer to the recommended value and the wiring length should be less than 5 meters. Otherwise it may damage the inverter.
d) Connecting terminals P1 and (+) of external DC reactor:
For the inverter above 18.5kW with external reactor, when assembling, remove the connector between terminals P1 and (+), and connect a DC reactor instead.
e) Terminals U, V, W at the output side of the inverter:
The inverter output side cannot connect to the capacitor or surge absorber. Otherwise, it may cause frequent inverter protection and even damage the inverter.
In case the motor cable is too long, it may generate electrical resonance easily due to the impact of distributed capacitance, thus damaging the motor insulation or generating higher leakage current to invoke over current protection of the inverter. When the length of motor cable is longer than 100 meters, it needs to install a AC output reactor.
f) Earth terminal PE:
This terminal should be earthed reliably, with resistance of earth cable of less than 0.1Ω. Otherwise, it may cause fault or damage the inverter.
3.2.6 Control Terminals and Connections
1) Control Circuit Terminals
| Figure | Inverter | Control terminal layout |
|---|---|---|
| Figure 3-9 | 1.5–710 kW | Upper row: AI1, AO1, +10V, GND, COM, CME, COM, PLC, +24V, HDO Lower row: AI2, AO2, GND, D1, D2, D3, D4, D5, D6, HDI; relay block: T1A, T1B, T1C |
2) Function Description of Control Terminal
Table 3-3 Description of control terminal function
| Type | Terminal symbol | Terminal name | Function description |
|---|---|---|---|
| Power supply | +10V ~ GND | External +10V power | Provides +10 V power supply for external units; maximum output current is 10 mA. It is generally used as the operating power supply for the external potentiometer. The potentiometer resistance range is 1 kΩ ~ 5 kΩ. |
| Power supply | +24V ~ COM | External +24V power | Provides +24 V power supply for external units. It is generally used as the operating power supply for digital input/output terminals and the external sensor. The maximum output current is 200 mA. |
| Power supply | PLC | External power input terminal | Connected to 24V by default upon delivery. When an external signal is used to drive D1 ~ D6 and HDI, PLC needs to be connected to the external power supply and disconnected from the +24V power terminal. |
| Analog input | AI1 ~ GND | Analog input terminal 1 | 1. Input range: DC 0 V ~ 10 V / 4 mA ~ 20 mA, determined by jumper J1 on the control board. 2. Input impedance: 22 kΩ (voltage); 500 Ω (current). |
| Analog input | AI2 ~ GND | Analog input terminal 2 | 1. Input range: DC 0 V ~ 10 V / 4 mA ~ 20 mA, determined by jumper J2 on the control board. 2. Input impedance: 22 kΩ (voltage); 500 Ω (current). |
| Digital input | D1 | Digital input 1 | 1. Optical coupling isolation, compatible with dual polarity input 2. Input impedance: 4.7 kΩ 3. Voltage range for level input: 9 V ~ 30 V |
| Digital input | D2 | Digital input 2 | 1. Optical coupling isolation, compatible with dual polarity input 2. Input impedance: 4.7 kΩ 3. Voltage range for level input: 9 V ~ 30 V |
| Digital input | D3 | Digital input 3 | 1. Optical coupling isolation, compatible with dual polarity input 2. Input impedance: 4.7 kΩ 3. Voltage range for level input: 9 V ~ 30 V |
| Digital input | D4 | Digital input 4 | 1. Optical coupling isolation, compatible with dual polarity input 2. Input impedance: 4.7 kΩ 3. Voltage range for level input: 9 V ~ 30 V |
| Digital input | D5 | Digital input 5 | 1. Optical coupling isolation, compatible with dual polarity input 2. Input impedance: 4.7 kΩ 3. Voltage range for level input: 9 V ~ 30 V |
| Digital input | D6 | Digital input 6 | 1. Optical coupling isolation, compatible with dual polarity input 2. Input impedance: 4.7 kΩ 3. Voltage range for level input: 9 V ~ 30 V |
| Digital input | HDI ~ CME / D7 ~ COM | High-speed pulse input terminal | In addition to the characteristics of D1 to D6, it can also be used as the high-speed pulse input channel. Maximum input frequency is 100 kHz. Caution: CME is internally insulated from COM, but they have been short-circuited externally (HDI is driven by +24V by default prior to delivery). When HDI needs to be driven by the external power, the short circuit between CME and COM must be disconnected. |
| Analog output | AO1 ~ GND | Analog output 1 | The voltage or current output is determined by jumper J3 on the control board. Output voltage range: 0 V ~ 10 V. Output current range: 0 mA ~ 20 mA. |
| Analog output | AO2 ~ GND | Analog output 2 | The voltage or current output is determined by jumper J4 on the control board. Output voltage range: 0 V ~ 10 V. Output current range: 0 mA ~ 20 mA. |
| Digital output | HDO ~ CME | High-speed pulse output / open collector output | It can be used as high-speed pulse output or open collector output, which is determined by function code P5-00. High-speed pulse output: maximum frequency is 100 kHz. Open collector output: optical coupling isolation, dual polarity; output voltage range: 0 V ~ 24 V; output current range: 0 mA ~ 50 mA. Note: CME is internally insulated from COM, but they have been short-circuited externally (HDO is driven by +24V by default prior to delivery). When HDO needs to be driven by the external power, CME and COM must be disconnected. |
| Relay output 1 | T1B – T1C | Normally closed terminal | Driving capacity: AC 250 V, 3 A, cos φ = 0.4 DC 30 V, 1 A |
| Relay output 1 | T1A – T1C | Normally open terminal | Driving capacity: AC 250 V, 3 A, cos φ = 0.4 DC 30 V, 1 A |
3) Description of Connection of Control Terminals
a) Analog input terminal:
Since the weak analog voltage signal is easy to suffer external interferences, it needs to employ shielded cable generally and the length should be no longer than 20 meters, as shown in Figure 3-10. In case the analog signal is subject to severe interference, and filter capacitor or ferrite magnetic core should be installed at analog signal source side, as shown in Figure 3-11
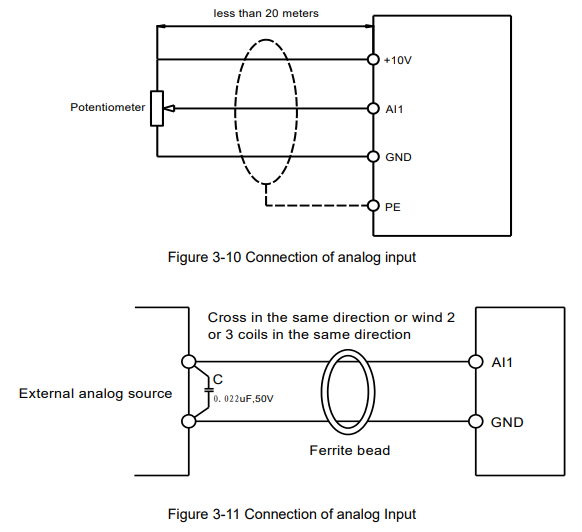
Diagram description (text version): Figure 3-10 Connection of analog input: a potentiometer connected to +10V, AI1 (wiper) and GND with a shielded cable shorter than 20 m; the cable shield is connected to PE at the inverter side only. Figure 3-11 Connection of analog input with interference suppression: external analog source wired to AI1 and GND; a 0.022 µF / 50 V capacitor is connected across the source side and the wires pass through a ferrite bead (cross in the same direction or wind 2–3 turns in the same direction).
b) Digital input terminal:
It needs to employ shielded cable generally, with cable length of no more than 20 meters. When active driving is adopted, necessary filtering measures should be taken to prevent the interference to the power supply.
It is recommended to use the contact control mode.
D1~D10 (D8~D10 on the I/O extension card) terminals connection: NPN type
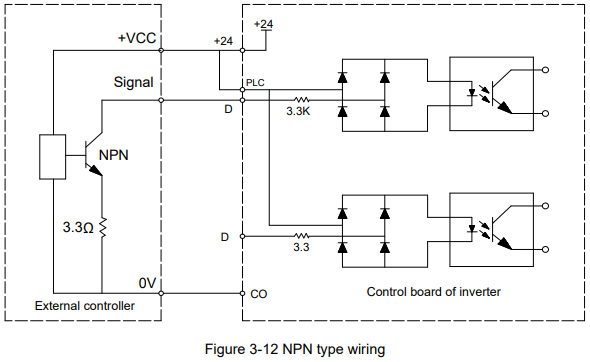
Diagram description (text version): Figure 3-12 NPN type wiring: the inverter internal +24V supply is connected to PLC; an external controller with NPN transistor outputs (3.3 Ω emitter resistor) pulls the digital inputs D… down to 0 V, and the controller 0 V is connected to COM. Inside the inverter each input goes through a 3.3 kΩ resistor and a bridge rectifier to an optocoupler on the control board.
This is the most commonly used wiring connection, if external power supply is used, the +24V terminal must disconnect with PLC terminal. The positive pole of external power supply should connect with PLC terminal, and the negative pole connects with COM.
D1~D10 (D8~D10 on the I/O extension card) terminals connection: PNP type
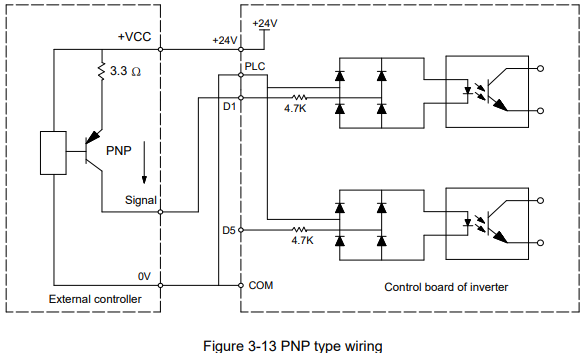
Diagram description (text version): Figure 3-13 PNP type wiring: the external controller +VCC is connected to +24V; PLC is connected to COM and to the controller 0 V. The PNP transistor output (3.3 Ω collector resistor) drives the inputs D1…D5 with the signal; inside the inverter each input goes through a 4.7 kΩ resistor and a bridge rectifier to an optocoupler on the control board.
In this type, +24V terminal must disconnect with PLC terminal, +24V should connect the common port of external controller, and meantime short connect PLC and COM.
Słowa kluczowe
Micno KE600, instalacja, installation, schemat połączeń, wiring diagram, zaciski, terminals, wyłącznik MCCB, stycznik, contactor, dławik, reactor, filtr EMC, rezystor hamujący, braking resistor, karta PG, PG card, NPN, PNP
No comments to display
No comments to display