
8. Device Settings – Part 4 (Code Reading Result and Contrast Control)
Streszczenie: Ustawienia ID5000 cz. 4: tryb wyprowadzania wyników (natychmiastowy/nienatychmiastowy), reguły filtrowania (normalne i wyrażenia regularne), format wyników dla Smart SDK, FTP i innych protokołów oraz kontrola porównania kodów (regularna i numerów kolejnych).
EN: ID5000 settings part 4: result output mode (instant/non-instant), filter rules (normal and regular expression), result format for Smart SDK, FTP and other protocols, and contrast control (regular and consecutive number).
Dotyczy: przemysłowy czytnik kodów Hikrobot serii ID5000 (złącze M12 12-pin, Gigabit Ethernet, RS-232; obsługa przez klienta IDMVS)
Źródło: dokumentacja producenta (Hikrobot ID5000 Series Industrial Code Reader User Manual, V2.5.0); opisy rysunków – opracowanie Multiprojekt
Rozdział 8 „Device Settings” – części: Part 1 – Image Quality | Part 2 – Code Algorithm | Part 3 – Signal Input, Output and Indicator | Part 4 – Code Reading Result and Contrast Control | Part 5 – Communication, User Set, Statistics, Events
← poprzednia część · następna część →
8.6 Code Reading Result Settings
In Data Processing module, you can set filter rules for reading barcodes and other data processing related parameters.
8.6.1 Set Code Reading Result Output Mode
There are 2 types of output modes when the device mode is Normal and trigger mode is On:
Instant output mode and non-instant output mode.
- Instant output mode means that the device can instantly output code reading results when recognizing codes if you enable Instant Output Mode Enable in Filter Rule.
- Non-instant output mode means that the device does not output code reading results it recognized until the trigger stops if Instant Output Mode Enable is not enabled. If the device does not recognize any codes during the whole process, images it captured will be output, and you can set which images to be outputted in NoRead Image Index.
When the device mode is Normal and trigger mode is Off, you can set Filter Time in Filter Rule. Within the configured Filter Time, the device will not output any code information.
Note: The filter rule and data processing parameters may differ with different device modes and trigger modes.
8.6.2 Set Filter Rule
You can set rules to filter unwanted barcodes to improve the reading efficiency in Filter Rule. Two filter modes are available, including normal mode and regular expression mode.
You can set it in Filter Mode.
Note: The filter rule parameters may differ with different device modes and trigger modes.
Normal Filter Mode
When the device mode is Normal, Trigger Mode is On, and Filter Mode is Normal, you can set the following parameters according to actual demands.
Instant Output Mode Enable
If this parameter is enabled, the device can instantly output code reading result when recognizing codes. If it is not enabled, the device will not output code reading result until the trigger stops.
Min. Output Time
It sets the min. waiting time before data output. For example, if you set 500 ms as Minimum Output Time, the barcode would not be outputted until 500 ms is passed.
Numeral Filter
If this parameter is enabled, the device will only parse and read the numeral contents of the barcodes, and the non-numeral contents will be filtered out.
Max Output Length
It sets the max. code length that can be outputted.
Code Offset Num
It sets the range of barcode to be filtered. For example, the barcode is ABCDEFG, if you set this parameter as 2, the device will output CDEFG at last and filter AB.
Begin with Specific Character for Result
If this parameter is enabled, the device will only read the barcodes which begin with a specific character. Otherwise, the barcodes will be filtered out. You can enter the specific character in Begin with.
Include Specific Character in Barcode
If this parameter is enabled, the device will only read the barcodes which include a specific character. Otherwise, the barcodes will be filtered out. You can enter the specific character in Character.
Exclude Specific Character in Barcode
If this parameter is enabled, the device will only read the barcodes which exclude a specific character. Otherwise, the barcodes will be filtered out. You can enter the specific character in Character.
Min. Code Length
If the length of a barcode is shorter (in terms of the number of characters contained in the barcode) than the configured value, the device will not parse the contents of the barcode.
The valid value is from 1 to 256. For example, if you set the value as 6, the device will not parse the contents of the barcodes which contain less than 6 characters.
Max. Code Length
If the length of a barcode is longer ((in terms of the number of characters contained in the barcode) than the configured value, the device will not parse the contents of the barcode.
The valid value is from 1 to 256. For example, if you set the value as 9, the device will not parse the contents of the barcodes which contain more than 9 characters.
Read Times Threshold
If the reading results of a barcode is same for the configured times, the barcode will be regarded as valid and its reading result will be outputted. Or the barcode will be regarded as invalid and its reading result will not be outputted.
De-duplication Enable
If it is enabled, the repeated code information will be filtered within specific trigger times. You can set trigger times in De-duplication Windows Size, and its default value is 1.
De-duplication By ROI
If it is enabled, the device will filter information based on drawn ROIs.
Regular Expression Filter Mode
Instant Output Mode Enable
If this parameter is enabled, the device can instantly output code reading result when recognizing codes. If it is not enabled, the device will not output code reading result until the trigger stops.
Min. Output Time
It sets the min. waiting time before data output. For example, if you set 500 ms as Minimum Output Time, the barcode would not be outputted until 500 ms is passed.
Max Output Length
It sets the max. code length that can be outputted.
Code Offset Num
It sets the range of barcode to be filtered. For example, the barcode is ABCDEFG, if you set this parameter as 2, the device will output CDEFG at last and filter AB.
Regular Expression
It selects the regular expression from order 1 to order 10. You can enter specific regular expression contents in Regular Expression Filter. Up to ten regular expression rules can be set at the same time. Once one regular expression is met, code can be outputted.
Regular Expression Filter
It sets the specific regular expression contents.
Min. Code Length
If the length of a barcode is shorter (in terms of the number of characters contained in the barcode) than the configured value, the device will not parse the contents of the barcode. The valid value is from 1 to 256. For example, if you set the value as 6, the device will not parse the contents of the barcodes which contain less than 6 characters.
Max. Code Length
If the length of a barcode is longer ((in terms of the number of characters contained in the barcode) than the configured value, the device will not parse the contents of the barcode.
The valid value is from 1 to 256. For example, if you set the value as 9, the device will not parse the contents of the barcodes which contain more than 9 characters.
Read Times Threshold
If the reading results of a barcode is same for the configured times, the barcode will be regarded as valid and its reading result will be outputted. Or the barcode will be regarded as invalid and its reading result will not be outputted.
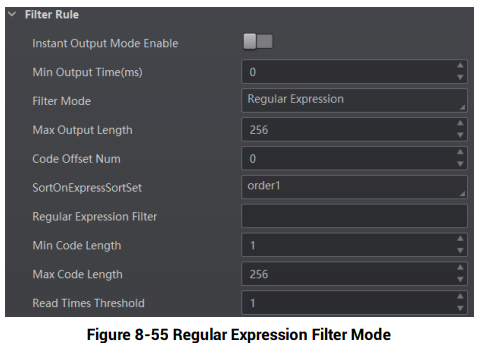
Figure 8-55 Regular Expression Filter Mode
Figure description (text version): Filter Rule group: Instant Output Mode Enable off, Min Output Time (ms) 0, Filter Mode Regular Expression, Max Output Length 256, Code Offset Num 0, SortOnExpressSortSet order1, Regular Expression Filter (empty), Min Code Length 1, Max Code Length 256, Read Times Threshold 1.
8.6.3 Set Result Format
Result format settings allow you to set the format and contents contained in the outputted barcode information. Result format is related to communication protocol and trigger mode.
With different selected communication protocol and trigger mode, you need to set corresponding parameters.
Note:
- Result format settings are only available if you select Smart SDK, TCP Client, TCP Server, Serial, FTP, Profinet, Melsec, Ethernet/IP, ModBus, Fins or SLMP as the communication protocol when the device mode is Normal.
- For details about communication protocols, see the section Communication Settings.
- The specific parameter names and values may differ by device firmware versions.
Result Output via Smart SDK
When the communication protocol is Smart SDK, device mode is Normal and trigger mode is On, you can set following parameters.
Sorting Rules
It decides the output order of codes, and you can select it according to actual demands.
One By One Enable
If it is enabled, the device will send one piece of code information each time in accordance with the specified interval. You can set the interval via One By One Interval and the default value 100 ms.
Local Save Picture Mode
It includes Off and NoRead. You can select NoRead to let the device save images when no code is read.
Local Picture Type
It sets the image saving type, including JPEG and BMP.
Local Override Strategy
It includes Off, Max Count, Loop Max Count, and Reserve Space. Off means that disk will not be overridden. Max Count means that the device will save image quantity configured in Local Override Max. Count, and no more imaged will be saved when the disk is full. Loop Max Count means that after the image quantity is reached the number configured in Local Override Max. Count, the device will delete the first image and continue to save the latest image. Reserve Space means that the device will save images when the disk is safe in terms of storage space If the available disk space is lower than configured value, and images will be deleted.
Local Override Max. Count
You need to set this parameter when selecting Max Count or Loop Max Count as Local Override Strategy.
Local Picture Name Content
It selects what contents you want to display in file name, including frame time, trigger No. and frame No.
Local Time Format
It selects a format type from the drop-down list for the time stamp contained in the file name. Take YYYYMMDD_HHMMSSFFF as an example, (from the left to the right) YYYY represents year, MM represents month, DD represents date, HH represents hour, MM represents minute, SS represents second, and FFF represents millisecond.
Local Save Picture Strategy
It sets the picture saving method. Four methods are available, including recently frame, all frames, range frames and specific frame. If specific frame is selected as Local Save Picture Strategy, you need to set Local Picture Index.
Result Output via FTP
The device also supports using the FTP communication protocol to send and receive data, and you can select it to output information. The configurable parameters below are related to the trigger mode, and here we take the external trigger mode as an example.
Note: The configurable parameters may differ if the internal trigger mode is enabled.
Sorting Rules
It decides the output order of codes, and you can select it according to actual demands.
One By One Enable
If it is enabled, the device will send one piece of code information each time in accordance with the specified interval. You can set the interval via One By One Interval and the default value 100 ms.
Local Save Picture Mode
It includes Off and NoRead. You can select NoRead to let the device save images when no code is read.
Local Picture Type
It sets the image saving type, including JPEG and BMP.
Local Override Strategy
It includes Off, Max Count, Loop Max Count, and Reserve Space. Off means that disk will not be overridden. Max Count means that the device will save image quantity configured in Local Override Max. Count, and no more imaged will be saved when the disk is full. Loop Max Count means that after the image quantity is reached the number configured in Local Override Max. Count, the device will delete the first image and continue to save the latest image. Reserve Space means that the device will save images when the disk is safe in terms of storage space If the available disk space is lower than configured value, and images will be deleted.
Local Override Max. Count
You need to set this parameter when selecting Max Count or Loop Max Count as Local Override Strategy.
Local Picture Name Content
It selects what contents you want to display in file name, including frame time, trigger No. and frame No.
Local Time Format
It selects a format type from the drop-down list for the time stamp contained in the file name. Take YYYYMMDD_HHMMSSFFF as an example, (from the left to the right) YYYY represents year, MM represents month, DD represents date, HH represents hour, MM represents minute, SS represents second, and FFF represents millisecond.
Local Save Picture Strategy
It sets the picture saving method. Four methods are available, including recently frame, all frames, range frames and specific frame. If specific frame is selected as Local Save Picture Strategy, you need to set Local Picture Index.
Output Retrans Enable
If this parameter is enabled, the data is allowed to retransmit to FTP server, and you should set specific value in Output Retrans Number.
Note: If data retransmission still fails after the allowed number of retransmissions is reached, the retransmission will be discarded.
FTP Picture Name Content
It selects what contents you want to display in FTP file name, including code content, code type, frame number, etc. You can select multiple contents as desired, and the selected contents will be displayed below.
FTP Transmission Conditions
It sets the condition to upload the data outputted by the device to FTP server. All refers to upload the data always. Read Barcode refers to upload the data only when the barcode is read by the device. No Read Barcode refers to upload the data only when no barcode is read by the device.
FTP Transmission Result Contain
It selects contents to upload to the FTP server. Just Result refers to only upload the content of the barcode. Just Picture refers to only upload the barcode picture. Result and Picture refers to upload both the content of the barcode and the picture.
FTP Time Format
It selects a format type from the drop-down list for the time stamp contained in the file name. Take YYYYMMDD_HHMMSSFFF as an example, (from the left to the right) YYYY represents year, MM represents month, DD represents date, HH represents hour, MM represents minute, SS represents second, and FFF represents millisecond.
FTP Result Prefix
It sets the prefix of FTP file name, including No, Result and All. No stands for no prefix for file name, and all images are saved in FTP root directory. Result stands for all images that code reading successfully will be saved in Read directory, and all images that code reading failed will be saved in Noread directory. All stands for all images will be saved in All directory.
FTP Save Picture Strategy
It sets the FTP picture saving method when no code is read. Four methods are available, including recently frame, all frames, range frames and specific frame. If specific frame is selected as FTP Save Picture Strategy, you need to set FTP Picture Index.
Result Output via Other Communication Protocols
When the communication protocol is TCP Client, TCP Server, Serial, Profinet, Melsec, Ethernet/IP, ModBus, Fins or SLMP, device mode is Normal and trigger mode is On, you can set following parameters.
Note:
- The configurable parameters may differ if the internal trigger mode is enabled.
- Here Profinet is taken as an example of Communication Protocols to introduce the parameters. For other communication protocols the configurable parameters are similar, with slight differences in parameter names; refer to the actual device you have.
Sorting Rules
It decides the output order of codes, and you can select it according to actual demands.
One By One Enable
If it is enabled, the device will send one piece of code information each time in accordance with the specified interval. You can set the interval via One By One Interval and the default value 100 ms.
ROI Output NoRead Enable
If it is enabled, codes will be outputted in turn according to the ROI Selector of the algorithm ROI they belong.
Local Save Picture Mode
It includes Off and NoRead. You can select NoRead to let the device save images when no code is read.
Local Picture Type
It sets the image saving type, including JPEG and BMP.
Local Override Strategy
It includes Off, Max Count, Loop Max Count, and Reserve Space. Off means that disk will not be overridden. Max Count means that the device will save image quantity configured in Local Override Max. Count, and no more imaged will be saved when the disk is full. Loop Max Count means that after the image quantity is reached the number configured in Local Override Max. Count, the device will delete the first image and continue to save the latest image. Reserve Space means that the device will save images when the disk is safe in terms of storage space If the available disk space is lower than configured value, and images will be deleted.
Local Override Max. Count
You need to set this parameter when selecting Max Count or Loop Max Count as Local Override Strategy.
Local Picture Name Content
It selects what contents you want to display in file name, including frame time, trigger No. and frame No.
Local Time Format
It selects a format type from the drop-down list for the time stamp contained in the file name. Take YYYYMMDD_HHMMSSFFF as an example, (from the left to the right) YYYY represents year, MM represents month, DD represents date, HH represents hour, MM represents minute, SS represents second, and FFF represents millisecond.
Local Save Picture Strategy
It sets the picture saving method. Four methods are available, including recently frame, all frames, range frames and specific frame. If specific frame is selected as Local Save Picture Strategy, you need to set Local Picture Index.
Profinet Output Format
It selects what contents you want to output, including code content, code type, angle, trigger start time, code score, etc. You can select multiple contents according to actual demands.
Profinet Format Check
You should click Execute in Profinet Format Check to check if you entered is right in format, and the check result will be displayed in Profinet Format Check Result.
Profinet Output NoRead
If it is enabled, and the device will output the content you set in Profinet Output NoRead Text when no code is recognized.
Profinet Output Start Text
The contents of the start part of the data outputted. You can set the contents according to actual condition.
Profinet Output Stop Text
The contents of the end part of the data outputted. You can set the contents according to actual condition.
Profinet Output Barcode Enter Character Enable
If it is enabled, enter character will be outputted.
Profinet Output Barcode Newline Character Enable
If it is enabled, a newline will be outputted.
Profinet Output Barcode Carriage Return Enable
If it is enabled, a carriage return will be outputted.
Profinet Add NoRead Enable
You can add contents to let the device output codes when the code recognized by the device does not meet the min. length requirement. It includes Off, Add Noread, and Just Noread. Off does not add contents and the device outputs code recognized only. Add Noread allows you to add contents to the min. length requirement and output. Just Noread means that the device outputs Noread only if the code recognized by the device does not meet the min. length requirement.
Code Pos Width Enable
If it is enabled, you can add 0 to codes if the code coordinate does not meet specified length.
Code Pos Width
You can enter the length of the code coordinate after enabling Code Pos Width Enable.
CodeNum End Trigger Min
If it is enabled, the device will stop triggering and save the current image when the code recognized by the device does not meet the min. length requirement.
8.7 Contrast Control Settings
Note: You need to set device mode as Normal before using this function.
The contrast control function compares the data that the device reads with preset data and outputs contrast result. The result can be used as the event source of trigger signal, including Contrast Success and Contrast Fail. This function has two ways to contrast, including regular contrast and consecutive number contrast.
Regular Contrast
The regular contrast requires you to set code contents in advance, and the client software will contrast the data that the device reads with preset contents and outputs comparison result.
Steps
- Right click the device in Device Connection, and click Feature Tree.
- Go to Contrast Control, enable Contrast Enable, and select Regular as Contrast Rules.
- Set Start Position that means the stating position of the comparison.
- Set Character Number that means the comparison quantity.
- Set code contents in Wildcard String.
Note: You can use wildcards * and ?. * stands for multiple characters and ? stands for one character. * can be used only once and ? can be used many times.
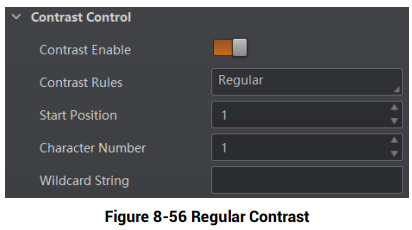
Figure 8-56 Regular Contrast
Figure description (text version): Contrast Control group: Contrast Enable on, Contrast Rules Regular, Start Position 1, Character Number 1, Wildcard String (empty).
Consecutive Number Contrast
The consecutive number contrast requires you to set consecutive code rules, and the client software will contrast the data that the device reads with preset rules and outputs contrast result.
Steps
- Right click the device in Device Connection, and click Feature Tree.
- Go to Contrast Control, enable Contrast Enable, and select Consecutive Number as Compare Rules.
- Set Start Position that means the stating position of the comparison.
- Set Digital Number that means the comparison quantity.
- Set Step that means the client software will increase or decrease the preset value after each comparison according the step you set.
Note:
- If the preset value after increase or decrease exceeds the digital number you set, the preset value will become 0.
- The base value displays the preset value.
- (Optional) Click Execute in Contrast Reset to reset comparison. After that, the client software will use the first code it reads as the preset value.
Here we take start position (3), digital number (2) and step (2) as an example to explain the consecutive number comparison:- If the first code that the device reads is ur96k, and then the preset value is 96. The preset value increases to 98 (96+2).
- If the second code is yr98kjkfd, and comparison succeeds. The preset value increases to 100 (98+2).
- If the third code is kl99fjkd, and comparison fails. The preset value does not increase.
- If the fourth code is kl00djf, and comparison succeeds. The preset value increases to 02 (00+2).
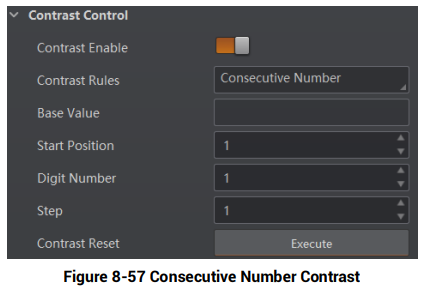
Figure 8-57 Consecutive Number Contrast
Figure description (text version): Contrast Control group: Contrast Enable on, Contrast Rules Consecutive Number, Base Value (empty), Start Position 1, Digit Number 1, Step 1, Contrast Reset (Execute).
Słowa kluczowe
Hikrobot ID5000, data processing, output mode, instant output, filter rule, regular expression, code length, read times threshold, de-duplication, result format, Smart SDK, FTP, Profinet output, NoRead, contrast control, wildcard, consecutive number
No comments to display
No comments to display