
1. Introduction
Streszczenie: Wprowadzenie do programu CME 2: wymagania komputera (system, port RS-232 lub USB, karty CAN), przeznaczenie oprogramowania do uruchamiania wzmacniaczy Copley (pliki .ccx/.ccm, programy CVM) oraz tryby pracy serwa i model kaskadowych pętli regulacji: położenia, prędkości i prądu.
EN: CME 2 introduction: host PC requirements, the commissioning software, servo operating modes and the cascaded control loop model.
Dotyczy: program CME 2 do konfiguracji i strojenia serwonapędów oraz napędów krokowych Copley Controls (m.in. Xenus, Accelnet, Stepnet, Accelus, Junus)
Źródło: dokumentacja producenta (Copley Controls CME 2 User Guide); tabele przepisane z obrazów na tekst, opisy diagramów – opracowanie Multiprojekt
This chapter describes the basic functions and operational theory of CME 2. Topics include:
- Host Computer Requirements
- Amplifier Commissioning Software
- Servo Operating Modes and Control Loops
1.1 Host Computer Requirements
1.1.1 Computer and Operating System
Minimal hardware requirements:
- CPU: 400 MHZ.
- RAM: 128 MB.
Operating Systems Supported: Windows NT, 2000, XP.
Vista users see Special Notes for Vista Users
1.1.2 Special Notes for Vista Users
Windows Vista is supported in this version of CME 2.
Note that when the installer starts, a message will be displayed stating that an unidentified program is trying to access the computer. Click the button to allow the installer to continue, and CME 2 will be installed properly.
On previous versions of Windows, the user data for CME 2 (like ccx, ccm, files, etc.) were stored in C:\Program Files\Copley Motion\CME 2. Because of Windows Vista security, the CME 2 user files are stored on Vista systems in C:\Users\Public\Public Documents\Copley Motion\CME 2.
1.1.3 Software
Copley Controls CME 2 software, Version 5.2 or higher.
1.1.4 Serial Communications
For each PC-to-amplifier connection via serial port:
- One standard RS-232 serial port or a USB port with a USB-to-RS-232 adapter.
- One serial communication cable. See amplifier data sheet for part numbers.
1.1.5 CAN Communications
(Xenus, Accelnet, and Stepnet only.)
- One Copley Controls CAN PCI network card (part number CAN-PCI-02). CME 2 also supports CAN network cards made by these manufacturers: KVaser, Vector, and National Instruments.
- One PC-to-amplifier CANopen network cable. See amplifier data sheet for part numbers.
See the amplifier data sheet for CAN network wiring instructions.
1.2 Amplifier Commissioning Software
Copley Controls CME 2 software allows fast and easy commissioning of Copley Controls amplifiers. It provides access to all amplifier configuration controls. It supports all Copley Controls amplifiers, including Copley’s CANopen amplifier lines and stepper amplifiers.
CME 2 communicates with amplifiers via RS-232 or CAN connections. On Xenus, Accelnet, and Stepnet amplifiers, the multi-drop feature allows CME 2 to use a single RS232 serial connection to one amplifier as a gateway to other amplifiers linked together by CAN bus or DeviceNet connections.
Motor data can be saved as .ccm files. Amplifier data is saved as .ccx files that contain all amplifier settings plus motor data. This makes it possible to quickly set up amplifiers by copying configurations from one amplifier to another.
CME 2 also provides access to Copley Virtual Machine (CVM), a program that is set up in CME 2 and downloaded to the amplifier to provide on-board control. When a CVM program is running, the amplifier receives its input commands from the CVM program. For more information, see the Copley Indexer 2 Program User’s Guide.
NOTE: The feature descriptions in this manual may not apply to all Copley Controls amplifiers under all configurations. Significant differences between amplifier models are noted. See the relevant hardware manual or data sheet for more information
1.3 Servo Operating Modes and Control Loops
Copley Controls amplifiers use up to three nested control loops - current, velocity, and position - to control a motor in three associated operating modes. (Stepper amplifiers operated in stepper mode function as traditional open position loop stepper drives.)
Control Loops Model
In position mode, the amplifier uses all three loops. As shown in the typical system illustrated below, the position loop drives the nested velocity loop, which drives the nested current loop.
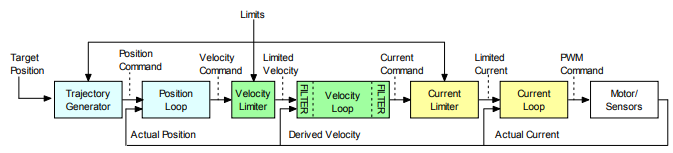
Diagram description (text version): Cascaded control loops of the amplifier: Target Position → Trajectory Generator → Position Loop (output: Position Command) → Velocity Limiter (output: Limited Velocity; Limits applied) → Velocity Loop with command and output filters (output: Current Command) → Current Limiter (output: Limited Current) → Current Loop (output: PWM Command) → Motor/Sensors. Feedback paths: Actual Current returns to the Current Loop, Derived Velocity to the Velocity Loop and Actual Position to the Position Loop and Trajectory Generator. In velocity mode the chain starts at the velocity loop; in current mode at the current loop.
In velocity mode, the velocity loop drives the current loop. In current mode, the current loop is driven directly by external or internal current commands.
Basic Attributes of All Servo Control Loops
| Loop Attribute | Description |
|---|---|
| Command input | Every loop is given a value to which it will attempt to control. For example, the velocity loop receives a velocity command that is the desired motor speed. |
| Limits | Limits are set on each loop to protect the motor and/or mechanical system. |
| Feedback | The nature of servo control loops is that they receive feedback from the device they are controlling. For example, the position loop uses the actual motor position as feedback. |
| Gains | These are constant values that are used in the mathematical equation of the servo loop. The values of these gains can be adjusted during amplifier setup to improve the loop performance. Adjusting these values is often referred to as tuning the loop. |
| Output | The loop generates a control signal. This signal can be used as the command signal to another control loop or the input to a power amplifier. |
For more information on using CME 2 to set up and tune control loops, see Control Loops
Słowa kluczowe
CME 2, wymagania systemowe, RS-232, CAN, CANopen, DeviceNet, pliki .ccx, pliki .ccm, CVM, tryby pracy, pętla prądowa, pętla prędkości, pętla położenia, generator trajektorii
No comments to display
No comments to display