
6. Digital Inputs and Outputs
Streszczenie: Wejścia i wyjścia cyfrowe wzmacniacza: funkcje wejść (enable, wyłączniki krańcowe, czujnik bazowy, reset, motor over temp. itd.) i ich standardowe przypisania, funkcje wyjść, wyjścia programowalne (Custom Event, Custom Trajectory Status, wyjście wyzwalane pozycją) oraz synchronizacja częstotliwości przełączania PWM.
EN: Digital inputs and outputs: input functions and assignments, output functions, custom outputs and PWM switching frequency synchronization.
Dotyczy: program CME 2 do konfiguracji i strojenia serwonapędów oraz napędów krokowych Copley Controls (m.in. Xenus, Accelnet, Stepnet, Accelus, Junus)
Źródło: dokumentacja producenta (Copley Controls CME 2 User Guide); tabele przepisane z obrazów na tekst – opracowanie Multiprojekt
This chapter shows how to configure the amplifier’s digital inputs and outputs. Perform the steps outlined below. Details follow in the chapter.
1.  Click Input/Output to open the Input/Output screen.
2. As needed, set Digital Inputs.
3. As needed, set Digital Outputs.
4. Click Close to close screen and save changes to amplifier RAM.
5.  On the Main screen, click Save to Flash to avoid losing the changes.
6.1 Digital Inputs
6.1.1 Digital Inputs Screen Overview
A typical Input/Output screen is shown below. (Features vary with amplifier model and configuration.)
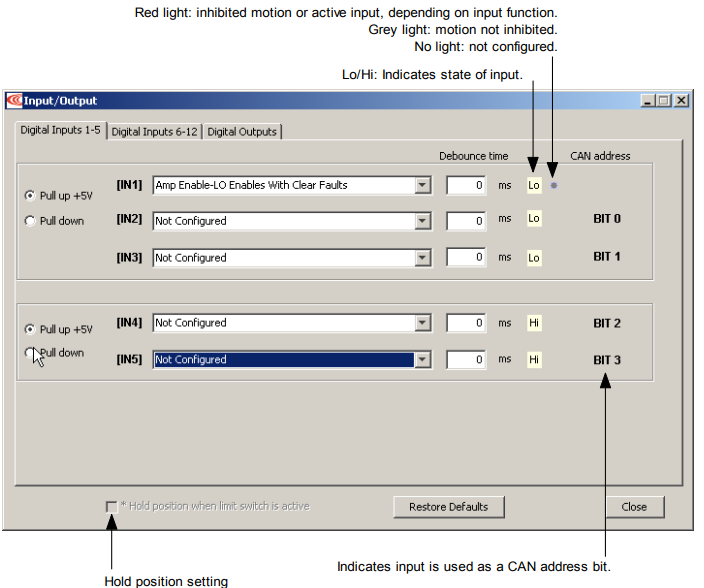
Digital Inputs – parameters
| Parameter | Description |
|---|---|
| Pull up +5 V | Pulls the group of inputs up to internal +5 V. |
| Pull down | Pulls the group of inputs down to internal signal ground. |
| Debounce Time | Specifies how long an input must remain stable at a new state before the amplifier recognizes the state. Increase to prevent multiple triggering caused by switch bounce upon switch closures. Range: 0 to 10,000 mSec. Debounce does not affect inputs that have been configured as PWM, Pulse and Direction, or Quadrature control inputs. |
| IN1-IN12 | Select the function for the input. See Digital Input Functions for input function descriptions. |
| *Hold position when limit switch is active | Available in position mode when one or more inputs are configured as a limit switch (NEG Limit-HI Inhibits, NEG Limit-LO Inhibits, POS Limit-HI Inhibits, or POS Limit-LO Inhibits). The *Hold position option prevents any motion while a limit switch is active. This option uses the Abort Deceleration rate to stop the motor as described in Trajectory Limits. CAUTION: If the amplifier is switched back to current or velocity mode with this option selected, the limit switches will no longer function. |
| Restore Defaults restores all inputs and outputs to factory defaults. Close button closes the screen. | |
6.1.2 Digital Input Functions
The programmable digital input functions are described below.
Digital Input Functions
| Input Function | Description |
|---|---|
| AMP Enable-LO Enables with clear faults | A low input will enable the amplifier. Any transition will clear latched faults and outputs. |
| AMP Enable-HI Enables with clear faults | A high input will enable the amplifier. Any transition will clear latched faults and outputs. |
| AMP Enable-LO Enables with reset | A low input will enable the amplifier. A low to high transition will reset the amplifier. |
| AMP Enable-HI Enables with reset | A high input will enable the amplifier. A high to low transition will reset the amplifier. |
| AMP Enable-LO Enables | A low input will enable the amplifier. |
| AMP Enable-HI Enables | A high input will enable the amplifier. |
| Not Configured | No function assigned to the input. |
| NEG Limit-HI Inhibits* | A high input will inhibit motion in negative direction. |
| NEG Limit-LO Inhibits* | A low input will inhibit motion in negative direction. |
| POS Limit-HI Inhibits* | A high input will inhibit motion in positive direction. |
| POS Limit-LO Inhibits* | A low input will inhibit motion in positive direction. |
| Reset on LO-HI Transition | A low to high transition of the input will reset the amplifier. |
| Reset on HI-LO Transition | A high to low transition of the input will reset the amplifier. |
| Motor Temp HI Disables | A high input will generate a Motor Over Temperature fault. |
| Motor Temp LO Disables | A low input will generate a Motor Over Temperature fault. |
| Home Switch Active HI | A high input indicates the home switch is activated. |
| Home Switch Active LO | A low input indicates the home switch is activated. |
| Motion Abort Active HI | A high input causes the amplifier to stop motion, using the Abort Deceleration rate described in Trajectory Limits. The amplifier remains enabled. |
| Motion Abort Active LO | A low input causes the amplifier to stop motion, using the Abort Deceleration rate described in Trajectory Limits. The amplifier remains enabled. |
| Hi Res Analog Divide Active HI | A high input causes the firmware to divide the level of the analog input signal by 8. |
| Hi Res Analog Divide Active LO | A low input causes the firmware to divide the level of the analog input signal by 8. |
| High Speed Position Capture on LO-HI Transition | Position will be captured on the low to high transition of the input. |
| High Speed Position Capture on HI-LO Transition | Position will be captured on the high to low transition of the input. |
| PWM Sync Input | PWM synchronization input. See Synchronizing PWM Switching Frequency. (For high-speed inputs only.) |
6.1.3 Standard Input Function Assignments
Enable Input: On most Copley Controls amplifiers, IN1 is dedicated to the enable function. Accelus uses IN2 for the enable function.
Other inputs can be programmed as additional enables. If there is more than one input programmed as an enable then all the inputs must be in the enabled state before the amplifier PWM output stage will be enabled.
Motor Over Temperature: On most Copley Controls panel amplifiers, IN5 is located on the motor feedback connector and is intended to be used for Motor Over Temperature.
Other: Other inputs may have predefined functions depending on mode of operation.
6.2 Digital Outputs
6.2.1 Screen Overview
A typical Digital Outputs screen is shown below. Options vary with amplifier.
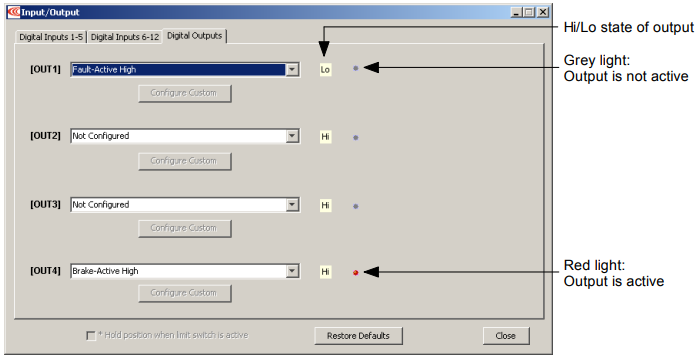
Digital Outputs – parameters
| Parameter | Description |
|---|---|
| Configure Custom | Opens screen to display custom digital output settings. Available only when function is set to Custom. |
| Restore Defaults | Restores all inputs and outputs to factory defaults. |
| Close | Closes screen and saves changes to amplifier RAM. |
6.2.2 Standard Output Functions
The standard output functions are described below. Custom output functions follow.
Digital Output Functions
| Output Function | Description |
|---|---|
| Not Configured | No function. Output remains high. |
| Fault Active High | Output goes high when one or more faults are detected. See Faults. |
| Fault-Active Low | Output goes low when one or more faults are detected. |
| Brake-Active High | Output goes high to activate the brake. See Brake/Stop Parameters. |
| Brake-Active Low | Output goes low to activate the brake. See Brake/Stop Parameters. |
| PWM Sync Output (OUT1 only) | The PWM synchronization output. See Synchronizing PWM Switching Frequency. |
| Custom Event | See Custom Digital Output Settings: Custom Event. |
| Custom Trajectory Status | See Custom Digital Output Settings: Custom Trajectory Status. |
| Custom Position Triggered Output | See Custom Output Settings: Position Triggered Output. |
| Program Control Active High | Output state controlled by CVM or external program. |
| Program Control Active Low | Output state controlled by CVM or external program. |
6.2.3 Custom Digital Output Settings: Custom Event
Any of the amplifier’s digital outputs can be programmed to respond to a combination of events including faults, warnings, and status indications. The output goes active when one or more of the selected events take place.
Configure a Custom Event output

1. Choose Custom Event for an output and then click Configure Custom to open the Event Configuration screen.
2. Select one or more Custom Event Functions Multiple functions are OR’ed together, so any event activates the output.
3. Choose Output Active High to have the output go high when active or Output Active Low to have the output go low when active.
4. To latch the output, set the Latch Output option.
DANGER: Latching an output does not eliminate the risk of unexpected motion with non-latched faults
Associating a fault with a latched, custom-configured output does not latch the fault itself. After the cause of a non-latched fault is corrected, the amplifier reenables without operator intervention. In this case, motion may re-start unexpectedly.
Failure to heed this warning can cause equipment damage, injury, or death.
5. Click OK to save changes to amplifier RAM and close the screen.
Custom Event Functions
Select any combination of events to configure a custom event output:
Custom Event – events
| Event | Description |
|---|---|
| Amplifier Fault | A latched fault is active. |
| Amp Over Temperature | For descriptions of these fault events, see Fault Configuration Parameters. |
| Motor Phasing Error | For descriptions of these fault events, see Fault Configuration Parameters. |
| Feedback Error | For descriptions of these fault events, see Fault Configuration Parameters. |
| Motor Over Temperature | For descriptions of these fault events, see Fault Configuration Parameters. |
| Under Voltage | For descriptions of these fault events, see Fault Configuration Parameters. |
| Over Voltage | For descriptions of these fault events, see Fault Configuration Parameters. |
| Short Circuit | For descriptions of these fault events, see Fault Configuration Parameters. |
| Current Limited | The current output is being limited by the I²T algorithm or a latched current fault has occurred. See Limits. |
| Voltage Limited | Current loop is commanding the full bus voltage in an attempt to control current. Commonly occurs when the motor is running as fast as the available bus voltage will allow. |
| Positive Limit Switch | Axis has contacted positive limit switch. |
| Negative Limit Switch | Axis has contacted negative limit switch. |
| Amp Disabled by Hardware | Amplifier enable input(s) is not active. |
| Amp Disabled by Software | Amplifier is disabled by a software command. |
| Attempting to Stop Motor | The amplifier, while in velocity or position mode, has been disabled. In velocity mode, amplifier is using the Fast Stop Ramp described in Velocity Loop Limits. In position mode, the amplifier is using the Abort Deceleration rate described in Trajectory Limits. The output remains active until the amplifier is re-enabled. |
| Motor Brake Active | Motor brake activated. See Brake/Stop Notes. |
| PWM Outputs Disabled | The amplifier’s PWM outputs are disabled. |
| Positive Software Limit | Actual position has exceeded the positive software limit setting. See Homing. |
| Negative Software Limit | Actual position has exceeded the negative software limit setting. See Homing. |
| Following Error | Following error has reached programmed fault limit. See Following Error Fault Details. |
| Following Warning | Following error has reached programmed warning limit. See Following Error Fault Details. |
| Position has Wrapped | The position counters have exceeded the maximum range of -2³¹ – 2³¹-1 and have wrapped. Normal amplifier operation is not affected. |
| Velocity Limited | The velocity command (from analog input, PWM input, or position loop) has exceeded the velocity limit. See Velocity Loop Limits. |
| Acceleration Limited | In velocity mode, motor has reached an acceleration or deceleration limit that was set as described in Velocity Loop Limits. |
| Pos Outside of Tracking Window | The following error has exceeded the programmed value. See Tracking Window Details. |
| Home Switch Active | Axis has contacted the home limit switch. |
| In Motion | The motor is moving, or it has not yet settled after a move. The amplifier is settled when it comes within the position tracking window and stays there for the tracking time at the end of a move. Once this bit is set, it remains set until a new move is started. |
| Vel Outside of Tracking Window | Difference between target and actual velocity has exceeded the window. See Tracking Window Details. |
| Phase not Initialized | Amplifier is using Phase Initialization function and phase is not initialized. |
| Command Input Fault | See Fault Configuration Parameters. |
Non-Latched vs. Latched Custom Event Digital Outputs
Like an amplifier fault, a custom-configured output can be non-latched or latched.
If a non-latched, custom-configured digital output goes active, it goes inactive as soon as the last of the selected events is cleared.
If a latched output goes active, it remains active until at least one of the following actions has been taken:
Power-cycle the amplifier
or Cycle (disable and then enable) an enable input that is configured as Enables with Clear Faults or Enables with Reset.
or  Access the CME 2 Control Panel and press Clear Faults or Reset.
Custom Event Output Fault Handling vs. Overall Fault Handling
A fault on an output programmed for Custom Event is separate from a fault on the amplifier. For instance, suppose:
- OUT3 has a Custom Event configuration. Only the Under Voltage fault condition is selected, and the output is latched.
- Under Voltage is not latched on the Configure Faults screen.
An under voltage condition occurs, and the amplifier goes into fault condition, output stages are disabled, and faults are reported. At the same time, OUT3 goes active.
The under voltage condition is corrected, and:
- The amplifier fault is cleared. Output stages are enabled.
- OUT3 remains active.
6.2.4 Custom Digital Output Settings: Custom Trajectory Status
Any of the amplifier’s digital outputs can be programmed to respond to a combination of amplifier trajectory status conditions. The output goes active when one or more of the conditions is met.
Configure a Custom Trajectory Status output
1.  Choose Custom Trajectory Status for an output and then click Configure Custom to open the Trajectory Status Configuration screen.
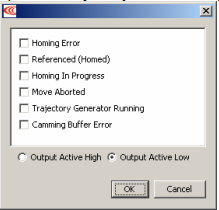
2. Select one or more trajectory status conditions described below. Multiple functions are OR’ed together, so any status match activates the output.
Trajectory Status Functions
| Status | Description |
|---|---|
| Homing Error | Activate output if an error occurred in the last homing attempt. |
| Referenced (Homed) | Activate output if the most recent homing attempt was successful. |
| Homing in Progress | Activate output when a homing move is in progress. |
| Move Aborted | Activate output if move is aborted. |
| Trajectory Generator Running | Activate output while trajectory generator is generating a move. |
| Camming Buffer Error | A camming buffer error has occurred. |
3. Choose Output Active High to have the output go high when active or Output Active Low to have the output go low when active.
4. Click OK to save changes to amplifier RAM and close the screen
6.2.5 Custom Output Settings: Position Triggered Output
Any of the amplifier’s digital outputs can be programmed to respond in certain ways to the position of the controlled axis. The output goes active when the axis position meets the specified criteria.
Configure a Position Triggered output
1.  Choose Custom Position Triggered Output for an output and then click Configure Custom to open the In Position Configuration screen.
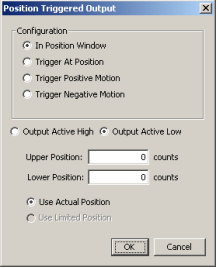
2. Select one of the configurations described below and enter appropriate values for the parameters.
Position Triggered Output – configurations
| Configuration | Description and Parameters |
|---|---|
| In Position Window | Activates the output while the axis is in the window between the programmed Upper and Lower positions. |
| Trigger at Position | Activates the output for the programmed Time when the axis travels through the programmed Position. |
| Trigger Positive Motion | Activates the output for the programmed Time when the axis travels in the positive direction through the programmed Position. |
| Trigger Negative Motion | Activates the output for the programmed Time when the axis travels in the negative direction through the programmed Position. |
3. Choose Output Active High to have the output go high when active or Output Active Low to have the output go low when active.
4. In stepper mode with no encoder, choose Use Limited Position. Otherwise choose Use Actual Position.
5. Click OK to save changes to amplifier RAM and close the Custom Output Configuration screen.
6.3 Synchronizing PWM Switching Frequency
In some situations, such as when sampling small analog signals, it is desirable to synchronize the PWM switching frequency among multiple amplifiers. In these cases, one amplifier serves as a master for one or more slave amplifiers. The PWM sync output of the master sends a signal that is received as a PWM sync input by each slave.
Słowa kluczowe
wejścia cyfrowe, wyjścia cyfrowe, enable, wyłącznik krańcowy, home switch, debounce, Custom Event, Custom Trajectory Status, wyjście wyzwalane pozycją, synchronizacja PWM
No comments to display
No comments to display