
15. Scope Tool
Streszczenie: Narzędzie Scope: generator funkcji i profil ruchu, zmienne śladu, wyzwalanie, czas i częstotliwość próbkowania, wyświetlanie (autoskalowanie, zoom), automatyczna konfiguracja, pomiary oraz zakładki parametrów pętli regulacji do strojenia.
EN: Scope tool: function generator and profiles, trace variables, triggering, display, measurements and loop-tuning tabs.
Dotyczy: program CME 2 do konfiguracji i strojenia serwonapędów oraz napędów krokowych Copley Controls (m.in. Xenus, Accelnet, Stepnet, Accelus, Junus)
Źródło: dokumentacja producenta (Copley Controls CME 2 User Guide); tabele przepisane z obrazów na tekst – opracowanie Multiprojekt
This chapter shows how to use the CME 2 Scope Tool to program and test motion sequences. Perform the steps outlined below to access the Scope Tool. Details follow in the chapter.
1.  Click to open the Scope Tool:
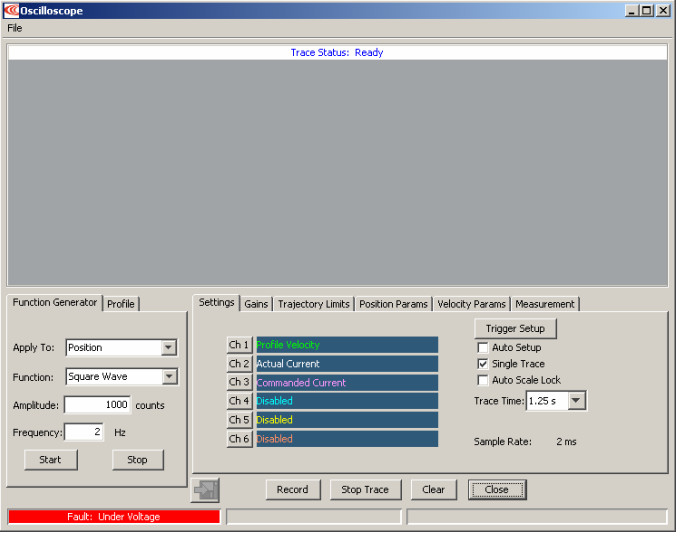
2. See this chapter for a Scope Tool Overview and details on:
- Function Generator and Profile Tabs
- Trace Channel Variable Parameters
- Trigger Setup
- Trace Time, Sample Rate and Single Trace
- Scope Display Parameters
- Auto Setup
- Measurement Tab
- Control Loop Parameters
15.1 Scope Tool Overview
The Scope Tool can be used to tune the amplifier, monitor performance, and perform diagnostics. Function Generator and Profile Generator can drive the motor without external control. Auto Set Up feature sets typical initial values for scope parameters.
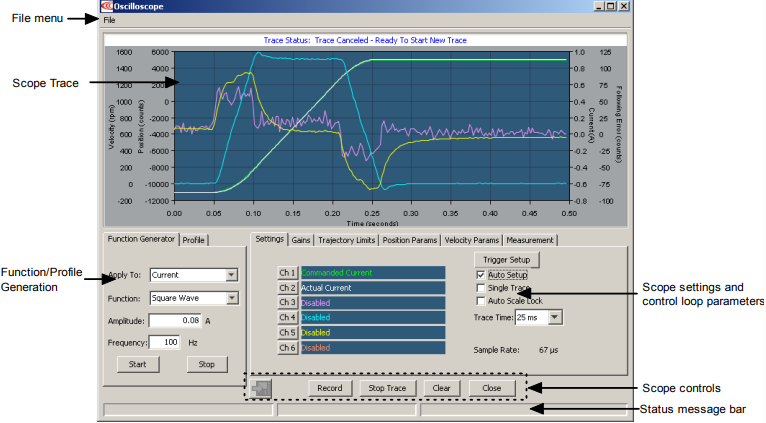
| Button | Description |
|---|---|
| Save trace (Save to Disk icon) | Save a trace. See Scope Trace Files. |
| Record | Begins recording a trace. |
| Stop Trace | Stops recording a trace. |
| Clear | Clears the trace from the screen and trace data from buffer. |
| Close | Closes the scope tool. |
Run a move with the Function Generator or Profile Tool
1. Click on the Function Generator or Profile tab.
2. Adjust Function Generator or Profile settings, scope tool settings, gains, limits, and parameters (as described later in this chapter).
3. Click Start to begin move and trace. Click Stop to stop the move
Monitor externally controlled motion
1. As required, adjust scope tool settings.
2. Click Record to begin trace.
3. Begin move with external controller. Click Stop Trace to stop the trace recording.
15.2 Function Generator and Profile Tabs
The Function and Profile generators can provide inputs to the different control loops for tuning and diagnostics purposes without using an external control source.
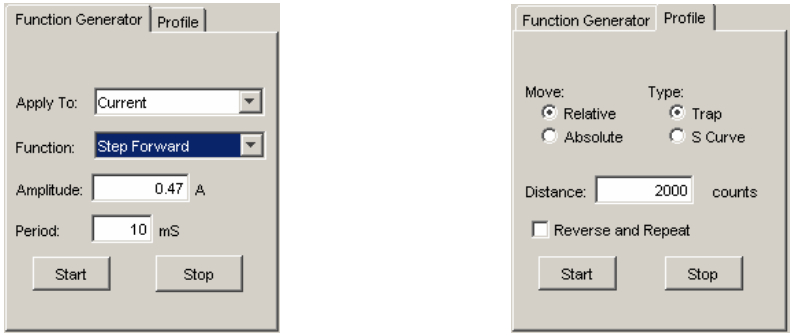
15.2.1 Function Generator Tab
Scope tool – Function Generator parameters
| Parameter | Description |
|---|---|
| Apply To | Control loop to which the Excitation will be applied: Current (available in all modes), Velocity (available in velocity or position mode), or Position (available in position mode only). |
| Function | Function that will be applied to the control loop selected in the Apply To list box. The choices vary with the control loop selected: Current – Sine Wave, Square Wave, Step Forward, Step Forward and Reverse, and Impulse; Velocity – Sine Wave, Square Wave, Step Forward, Step Forward and Reverse; Position – Sine Wave, Square Wave. |
| Amplitude | Amplitude of the command. Units vary depending on the value chosen in the Apply To field. |
| Frequency | (Sine Wave and Square Wave only.) Frequency of input command cycle. |
| Period | (Step Forward, Step Forward and Reverse, and Impulse only.) Duration of each input pulse. |
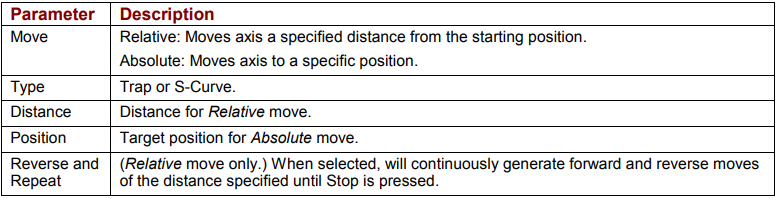
15.2.2 Profile Tab
15.3 Trace Channel Variable Parameters
Choose a trace variable for display in a Scope channel
1.  Click the channel button.
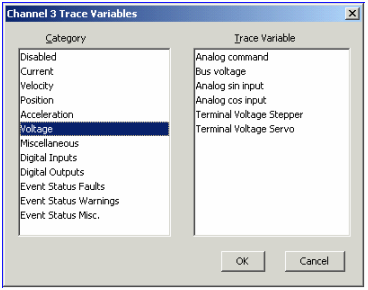
2. Choose a category and a trace variable.
Scope tool – trace variables by category
| Category | Trace Variable |
|---|---|
| Disabled | <Channel disabled, no associated variable> |
| Current | Commanded Current, Actual Current, Limited Current, I²T Amplifier Accumulator, I²T Motor Accumulator. |
| Velocity | Profile Velocity, Commanded Velocity, Limited Velocity, Actual Motor Velocity, Actual Load Velocity, Unfiltered Motor Velocity, Velocity Error. |
| Position | Commanded Position, Limited Position, Actual Load Position, Actual Motor Position, Following Error, Passive Load Position. |
| Acceleration | Profile Acceleration. |
| Voltage | Analog Command, Bus Voltage, Analog sin Input, Analog cos Input, Terminal Voltage Stepper, Terminal Voltage Servo. |
| Misc. | Motor Phase Angle, Amplifier Temperature, Hall States. |
| Digital Inputs | Digital input line states. |
| Digital Outputs | Digital output line states. |
| Event Status Faults (see Fault Configuration Parameters) | Short Circuit, Amp Over Temperature, Over Voltage, Under Voltage, Motor Over Temperature, Feedback Error, Motor Phasing Error, Following Error, Command Input Fault, Amplifier Fault (a latched fault is active). |
| Event Status Warnings (see Custom Event Functions) | Current Limited, Voltage Limited, Positive Limit Switch, Negative Limit Switch, Following Warning, Velocity Limited, Acceleration Limited, Positive Software Limit, Negative Software Limit, Pos Outside of Tracking Window, Vel Outside of Tracking Window. |
| Event Status Misc. (see Custom Event Functions) | Amp Disabled by Hardware, Amp Disabled by Software, Attempting to Stop Motor, Motor Brake Active, PWM Outputs Disabled, Position Has Wrapped, Home Switch Active, In Motion, Phase Not Initialized. |
3. Click OK.
15.4 Trigger Setup
Set up Scope trace trigger (manual setup)
1.  Click Trigger Setup to open the screen:
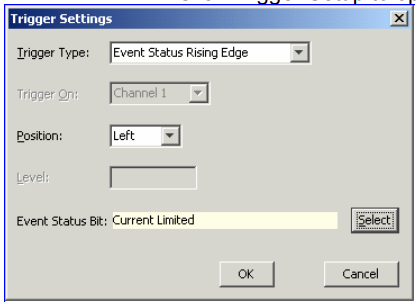
2. Choose from the settings described below:
Scope tool – Trigger settings
| Setting | Description |
|---|---|
| Trigger Type | Selects trigger type: Immediate Trigger – trace begins as soon as Record is pressed; Rising Edge – trace triggers when (after Record is pressed) the trigger signal rises though the trigger level setting; Falling Edge – trace triggers when (after Record is pressed) the trigger signal falls though the trigger level setting; Above Level – trace triggers when the trigger signal is greater than or equal to the trigger level setting; Below Level – trace triggers when the trigger signal is less than or equal to the trigger level setting; Function Generator – trace begins in synchronization with the Function Generator; Move Start (position mode only) – trace begins in synchronization with the trajectory generator; Event Status Rising Edge/Event Status Falling Edge – trigger on the rising or falling edge of changes to events chosen in the Event Status Bit setting (below); Input Level High/Input Level Low – trigger when specified input is high or low; Output Active/Inactive – trigger when specified output is active or inactive (note that outputs can be configured to be active when high or low). (Not available on Accelus or Junus.) |
| Trigger On | Selects which channel will be used as the trigger signal: 1, 2, 3, 4, 5, or 6. |
| Position | Selects placement of the trigger event on the screen. (Value is not configurable for Immediate or Function Generator trigger types.) Left – for optimal viewing of events following the trigger; Middle – for optimal viewing of events preceding and following the trigger; Right – for optimal viewing of events preceding the trigger. |
| Level | Sets the trigger level, in units appropriate to the channel selected. |
| Event Status Bit | With an event status trigger type selected, choose the event status word bit that will trigger the trace. For descriptions of the event status word bits, see Custom Event Functions. |
15.5 Trace Time, Sample Rate and Single Trace
Trace Time sets the length of the recorded trace.
Sample Rate is the rate at which the signals are sampled. The rate depends on the trace time, the number of channels selected, and which variables are being traced.
Single Trace puts the scope in a single trace mode of operation. In this mode, the trigger is not re-armed after a trace until the user presses the Record button. Single Trace is automatically set by the generators in certain cases.
15.6 Scope Display Parameters
The user can set the line style and other scope screen preferences. Right-click on the scope screen to display the menus, as shown below.
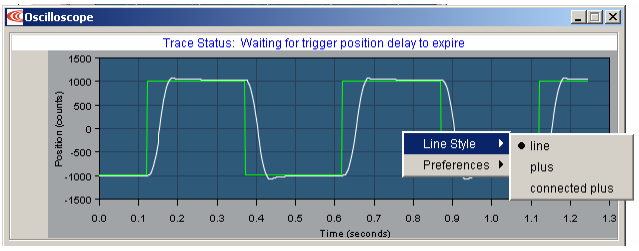
The Scope display parameters are described below
Scope tool – display menus
| Menu | Parameter | Description |
|---|---|---|
| Line Style | line | A line connects the plotted data points. |
| Line Style | plus | The Scope plots data points as plus signs, with no connecting line. |
| Line Style | connected plus | Data points are plotted as plus signs and are connected with a line. |
| Preferences | anti-aliasing | When anti-aliasing is selected, the Scope smoothes out any screen-related jaggedness in the displayed trace. Use of this feature may slow down the refreshing of traces on slow computers. |
| Preferences | grid | When selected a grid is displayed on the scope screen. |
15.6.1 Auto Scale and Auto Scale Lock
The Scope automatically scales the display axes to optimally display all channels. With Auto Scale Lock selected, the y-axis locks its scale for all subsequent traces.
15.6.2 Zoom
Zoom in on a Trace Segment
1. Hold the left mouse button down while dragging a box around the area of interest
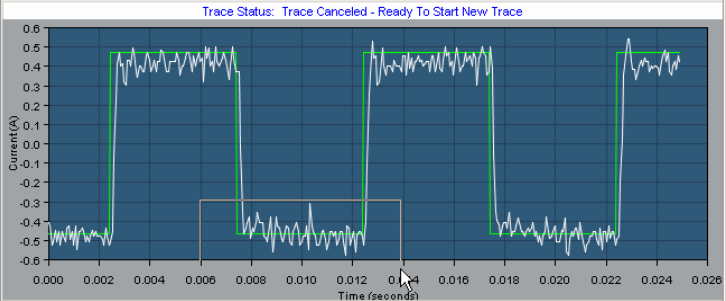
2. Release the button to let the display zoom in on the selected area.
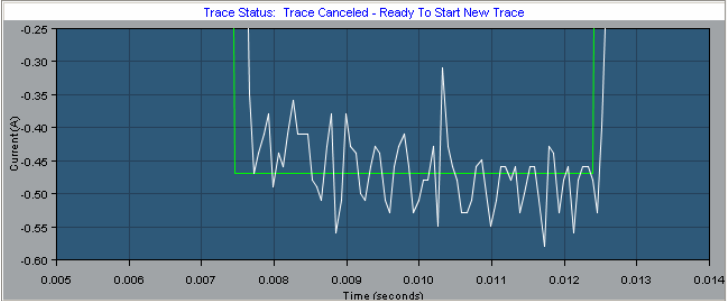
3. To restore the normal zoom level immediately, left-click anywhere on the trace. (Normal zoom level is also restored when the next trigger event occurs.)
15.7 Auto Setup
With Auto Set Up selected, if the function generator tab is active, CME 2 automatically sets the scope settings and the function generator's amplitude and frequency/period to best suit the function generator's Apply To and Excitation mode settings. If the Profile tab is active, CME 2 automatically sets the scope settings and sets a standard move into the profile generator. Changing any of the preset settings de-selects the Auto Set Up feature.
15.8 Measurement Tab
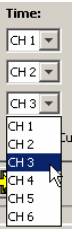
The Measurement tab allows you to measure and analyze data from up to three parameters during an interval defined by adjustable cursors. The Cursor Data area displays a parameter’s values at the left and right cursor locations, and the difference between the two values. The Analysis area displays the minimum, maximum, average, and root mean square of the parameters during the cursor period.
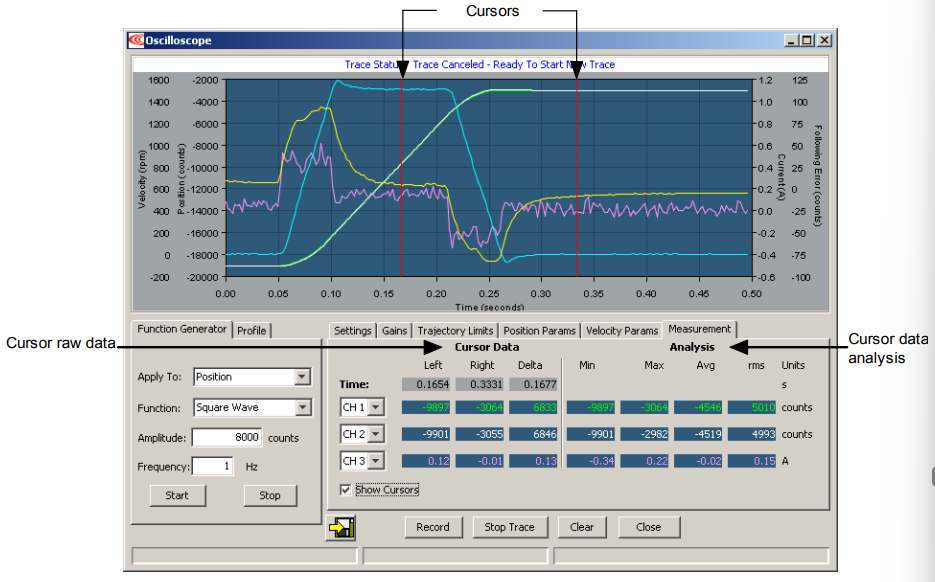
When Show Cursors is not set, the Cursor Data fields are inactive and the Analysis fields show calculations based on data from the entire trace cycle.
Basic Measurement Operations
1.  To display cursors and activate the Cursor Data fields, set Show Cursors.
2. To move a cursor, click on the cursor and hold the left button while dragging the cursor to the desired location. Release the left button to place the cursor in the new location.
3. To select a parameter to measure and analyze within the cursors, choose a channel in one of the three channel lists on the Measurement tab:
15.9 Control Loop Parameters
The Scope tool provides convenient access to all of the control loop parameters that might be used in tuning and diagnosing an amplifier. The user can adjust these parameters and see the results immediately on the scope. Control loop parameters are accessed through a set of tabs, shown below.
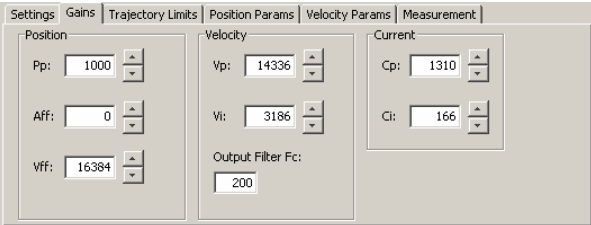
Note that the parameters represented on these tabs can also be accessed through the screens used to configure the control loops and the digital position input. Changing a value in the Scope tool automatically updates the value on the other screens where it appears, and vice versa.
Control loop parameter tab descriptions follow
15.9.1 Gains Tab
The Gains tab provides access to all of the gains appropriate to the operating mode, as described below.
Scope tool – gains available for tuning
| Modes | Gains | Description | For More Information |
|---|---|---|---|
| Position mode only | Pp | Position loop proportional gain. | Trajectory Limits |
| Position mode only | Aff | Acceleration feed forward. | Trajectory Limits |
| Position mode only | Vff | Velocity feed forward. | Trajectory Limits |
| Position or velocity mode only | Vp | Velocity loop proportional gain. | Velocity Loop Gains |
| Position or velocity mode only | Vi | Velocity loop integral gain. | Velocity Loop Gains |
| Position or velocity mode only | Output Filter Fc | Velocity Loop Output Filter cut-off frequency. | Low-Pass and Bi-Quad Filters |
| All modes | Cp | Current loop proportional gain. | Current Loop Gains |
| All modes | Ci | Current loop integral gain. | Current Loop Gains |
| All modes | ECp | Encoder Correction Gain. | Encoder Correction |
15.9.2 Trajectory Limits Tab
In position mode, the Trajectory Limits tab can be used to set trajectory limits.
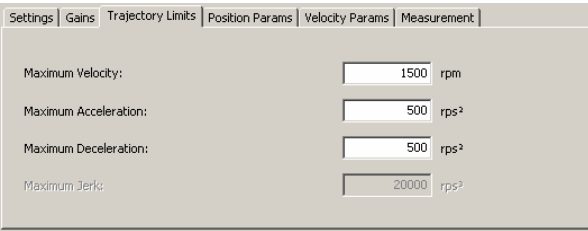
For more information on the velocity and acceleration limits, see Trajectory Limits. For more information on the Maximum Jerk setting, see Test S-Curve Profile
15.9.3 Position Loop Parameters
In position mode, the Position Params tab can be used to set position loop parameters
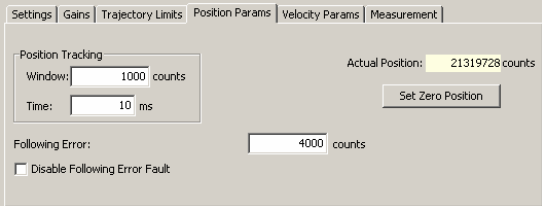
Set Zero Position sets the amplifier’s actual position count to zero. For more information on the other settings, see Position and Velocity Error Notes
15.9.4 Velocity Loop Parameters
In position and velocity modes, the Velocity Params tab can be used to set velocity loop parameters.
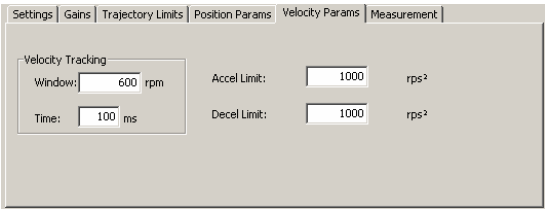
For information on the Velocity Tracking parameters, see Position and Velocity Error Notes. For information on the limits, see Velocity Loop Limits.
15.10 Scope Files
The Scope Tool allows you to save both scope settings and scope trace data. Saving the scope settings is useful for saving custom settings used for tests that are run frequently. Saving the trace data is useful for archiving the performance of a system so that it can be used as a reference at a later date for comparison.
15.10.1 Scope Settings Files
The Scope Tool File → Save Settings command allows you to save scope settings (settings on the Function Generator, Profile, and Settings tabs in a .sco file. The File → Restore Settings command restores them for quick setup.
Save scope settings
1. On the Function Generator, Profile, and Settings tabs, choose the scope settings you wish to save.
2. Choose File → Save Settings.
3. When prompted, enter a File Name. If needed, navigate from the default ScopeData folder to another folder where you wish to store the file.
4. Click Save to save the .css file and close the screen.
Restore scope settings
1. In the Scope Tool, choose File → Restore Settings.
3. Highlight the filename and click Open
15.10.2 Scope Trace Files
The Scope Tool can save trace data in Copley Controls scope files (.sco files) that can be opened later with the CME 2 Trace Viewer. Simultaneously, a version of the same trace is stored in a comma-separated text file (.csv) and a tab delimited file (.txt), either of which can be opened with a spreadsheet application such as Microsoft Excel (or other programs) for mathematical analysis. The format of the .csv and the .txt file is the same:
- Column 1: time
- Column 2: Trace Channel 1
- Column 3: Trace Channel 2 (if used)
- Column n: Trace Channel n (if used)
NOTE: By default, scope files are saved in the ScopeData folder in the CME 2 installation folder. For instance, c:\Program Files\Copley Motion\CME 2\ScopeData. Use these procedures to save and view trace files:
Save trace data
1. Generate the trace you wish to save.
2.  In the Oscilloscope window, click the Save to Disk icon.
3. When prompted, enter a File Name. If needed, navigate from the default ScopeData folder to another folder where you wish to store the file.
4. Click Save to save the .sco, .txt, and .csv files in the same folder and close the screen.
View a trace file
1. On the Main screen, choose Tools → View Scope Files to open the window.
2. Click Open File. When prompted, select the name of the file you wish to open. Then, click Open to display the file in the Trace Viewer window.
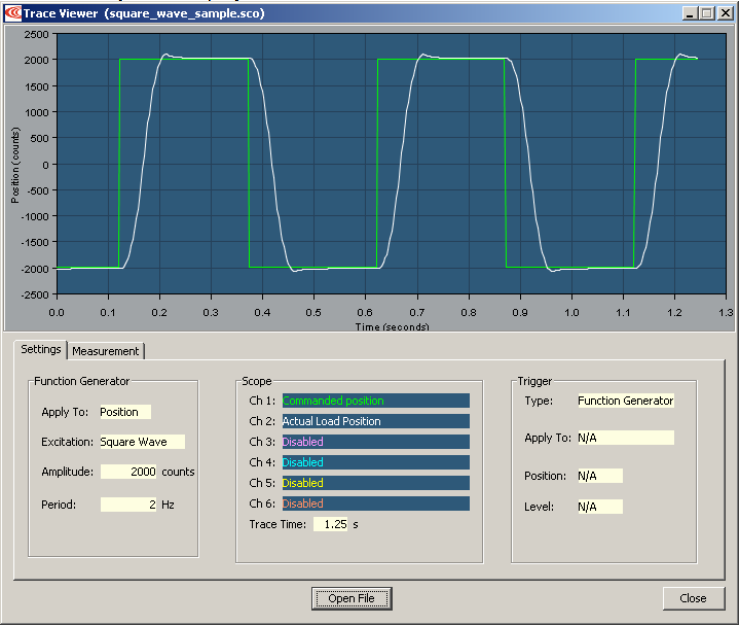
The Measurement tab allows you to measure and analyze data from up to three parameters during an interval defined by adjustable cursors. See Measurement Tab.
Słowa kluczowe
Scope, oscyloskop, generator funkcji, profil, trace, wyzwalanie, trigger, próbkowanie, autoskalowanie, zoom, pomiary, strojenie, wzmocnienia
No comments to display
No comments to display